OpenITI documentation

NB: this documentation is a work in progress. Please feel free to contact us if you feel something is missing or unclear.
- A brief history of the OpenITI corpus
- Goals
- Working version (GitHub repositories) vs. Corpus Releases (Zenodo)
- The GitHub repositories
- Zenodo releases
- What texts are in OpenITI?
- Further reading
2. Structure and organization of the OpenITI GitHub
- Why use a version control system?
- Getting started with GitHub
- Working with OpenITI text repositories
- Create your personal copy of an OpenITI repo: Forking
- Create a copy of your OpenITI fork on your computer: Cloning
- Keep up to date with OpenITI: pull changes
- Set up a direct connection between your local repo and the one on OpenITI’s GitHub page
- Synchronize your local repository with the “upstream” repo
- Save your changes: add and commit
- Contribute to OpenITI: push changes and pull requests
- Summary
- Raising GitHub issues
- Contributing New Texts
- Further reading on GitHub
5. Software (versions and installation)
6. Teaching and learning resources
- How can I find a text in OpenITI?
- The text I'm looking for is not in OpenITI. What now?
- How do I add a text to the OpenITI corpus?
- How do I request a new text be added?
- How do I cite OpenITI texts?
- Do you use texts generated by Optical Character Recognition?
- How can I help develop OpenITI?
- I found a typo in a text / a mistake in the metadata or URI. How do I flag this?
- How can I use OpenITI? What license is used?
- what about copyright issues?
- Why do you use mARkdown rather than TEI? Can I convert my TEI tags to mARkdown or vice versa?
- A text I am researching is in the corpus but not annotated, or the annotation is insufficient for my research interests. What do I do?
- I am not sure there is an appropriate mARkdown annotation, or I am not sure how to annotate a particular part of a text. What do I do?
1. What is OpenITI?
OpenITI is a corpus of digital Islamicate texts. It is mainly meant as the foundation that can be used for new forms of macro textual analysis and digital scholarship. It is (currently) not a digital library with a user interface, reading environment and search functions.
A brief history of the OpenITI corpus
OpenITI was founded in 2016 by Maxim Romanov, Sarah Savant and Matt Miller, who each had been working on individual corpus projects, because of their dissatisfaction with existing repositories of digital Arabic and Persian texts. They described the problem with these text collections as threefold: “they are not compliant with any international data standards; they typically lack scholarly metadata; and they do not adequately represent the diversity of the historic traditions.”
The principles on which the new corpus should rest have been described in a research paper published in 2018: the corpus should be developed as a collective effort by the field, “address the research needs of scholars and meet academic standards in terms of the quality of their texts and metadata”, and promote open research by offering clear metadata on the provenance of digitized texts, providing a sustainable way of citing these digital texts, and ensuring the data conforms to international data standards and frameworks, guaranteeing the usability of the corpus for the widest range of digital research. The corpus can be used free of charge, but users pledge to help develop the corpus by flagging problems with the texts, providing new texts for the corpus, etc.
The first iteration of the corpus, OpenArabic, was developed by Maxim Romanov, first at Tufts University (at The Perseus Project, 2013–2015) and then at Leipzig University (at the Alexander von Humboldt Chair for Digital Humanities, 2015–2017), in both cases with the support and under the patronage of Prof. Gregory Crane. The Persian branch of the project has its origin in the Persian Digital Library, developed by Matt Miller at the Roshan Institute for Persian Studies, University of Maryland.
Goals
The OpenITI’s main aim is to provide the “textual infrastructure (…) for new forms of macro textual analysis and digital scholarship” for Islamicate texts, that is, texts written by Muslims and/or in contexts in which Muslims were socially and culturally dominant. This includes texts written by Muslims and non-Muslims, on any imaginable topic, in a variety of languages, including of course Arabic, New-Persian and Turkish (used by Muslims and non-Muslims alike), but also Syriac, Hebrew and Middle-Persian (used primarily or even exclusively by non-Muslims). The infrastructure will be described below; it includes a corpus of Islamicate texts (in plain text format with minimal markup to facilitate the widest possible range of computational analysis), and associated metadata on the texts, their authors and digitizations.
The corpus is organised on GitHub, based on established practices in the Digital Humanities and organised based on the approach used by Canonical Text Services (CTS) - as used, for example, in the Perseus Digital Library. The corpus is organised to be machine-actionable. A uniform organisation and tagging scheme within texts ensures that the files can be easily identified and accessed using various scripts, allowing us to apply digital methods at the corpus level, or select a particular part of the corpus for analysis (potentially based on metadata). Annotation further allows for files to be analysed or compared at the structural level (at the level of specific chapters, sections of paragraphs) The structure of the corpus might look unfamiliar to those used to accessing texts through libraries, but it is essential for performing digital tasks at scale.
The OpenITI corpus is evolving. Texts are constantly being added and annotated and metadata is being revised. For the OpenITI to function, it must be maintained and updated in a uniform manner. The policies for corpus management and annotation set out in the OpenITI documentation ensure that the corpus remains uniform, up-to-date and useful for future digital analysis.
Working version (GitHub repositories) vs. Corpus Releases (Zenodo)
Users of the OpenITI corpus will find the corpus in two key locations: GitHub (https://github.com/openiti) and Zenodo (links for specific releases given below). The first is the active version of the corpus, and the second keeps snapshots of the corpus at a given time, for citation purposes.
The GitHub repository
GitHub is where contributors to the OpenITI corpus do most of their work. It allows for version control, which ensures nothing is lost (see further, the sections on GitHub). Texts can be downloaded from the GitHub repository, annotated and then put back. It is the place where new texts are first added, annotations are updated and verified and where automated experiments on the corpus are first undertaken. Work in GitHub can be experimental and iterative, because version control (plus the use of forking) helps protect against mistakes.
Further reading:
Zenodo releases
High quality research must be citable and verifiable. If we are to publish the results of an experiment, another reader must be able to check the results if they so wish. In this case, citing the OpenITI GitHub is inappropriate, because it is subject to constant change. A text cited from the OpenITI might not be the same in two years' time (it might have been further annotated, or some errors might have been corrected).
For this reason we release the corpus regularly onto Zenodo. This is a platform that allows for the archiving of data that can be linked throughout time without any risk of change. The corpus is released onto Zenodo with a specific version number (based on the date of the release). A full record of the releases is found here. See also the list of releases below:
| Link | How to cite? |
|---|---|
| Zenodo release 2019.1.1 | Maxim Romanov, Masoumeh Seydi, 2019: OpenITI: A Machine-Readable Corpus of Islamicate Texts. Version 2019.1.1. https://zenodo.org/record/3082464#.X9CjwGj7RPY |
| Zenodo release 2020.1.2 | Lorenz Nigst; Maxim Romanov; Sarah Bowen Savant; Masoumeh Seydi; Peter Verkinderen, 2020: OpenITI: A Machine-Readable Corpus of Islamicate Texts. Version 2020.1.2. https://zenodo.org/record/3891466#.X9CjZGj7RPY |
| Zenodo release 2020.2.3 | Lorenz Nigst; Maxim Romanov; Sarah Bowen Savant; Masoumeh Seydi; Peter Verkinderen, 2020: OpenITI: A Machine-Readable Corpus of Islamicate Texts. Version 2020.2.3. https://zenodo.org/record/4075046#.X9I1jNj0lPZ |
| Zenodo release 2021.1.4 | Lorenz Nigst; Maxim Romanov; Sarah Bowen Savant; Masoumeh Seydi; Peter Verkinderen, 2020: OpenITI: A Machine-Readable Corpus of Islamicate Texts. Version 2021.1.4. https://zenodo.org/record/4513723#.YDYKUmj0ncs |
When publishing research, it is important to refer to the exact release number that was used for the research project. For example, if one downloaded the 2019.1.1 version of the corpus from Zenodo and did text mining using that corpus, one should cite 2019.1.1 in the paper. This allows other readers to repeat results. It also allows us to associate analysis of the full corpus with a release number (for example passim runs are always associated with a particular Zenodo release).
The DOI 10.5281/zenodo.3082463 will always refer to the latest release of OpenITI.
What texts are in OpenITI?
The latest release of OpenITI contains 10,202 text files, each of which contains the full text of a work (whether it is a single-volume or multi-volume work). For some works, the corpus contains multiple versions (digitizations of distinct paper editions, distinct digitizations of the same edition, identical digitizations of the same edition). The 10,202 text files represent 6,236 distinct works, by 2,582 distinct authors.
In its current state, the OpenITI corpus consists almost exclusively of Arabic texts, with a strong focus on the pre-modern period:
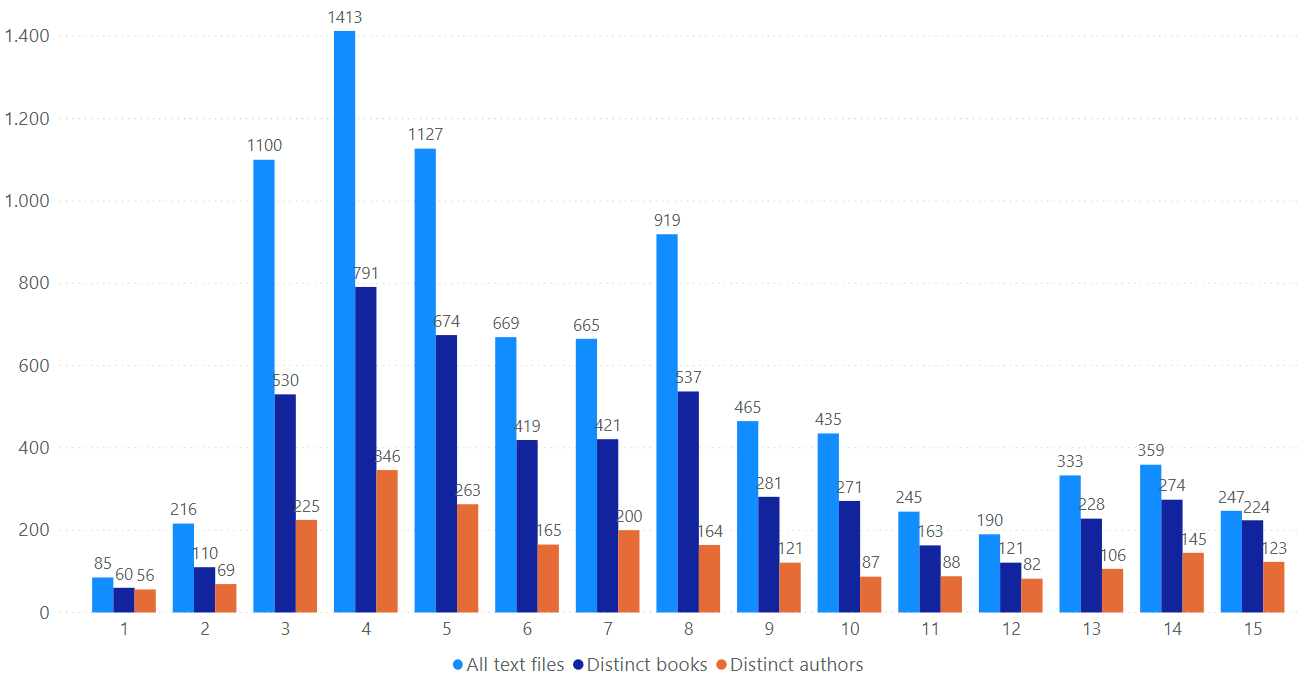
Text files in OpenITI, per hijrī century (light blue: number of text files; dark blue: number of distinct books; red: number of distinct authors). NB: pre-Islamic texts are in the first-century column, texts by authors still alive in the 15th-C column. (data: Dec. 2020)
These text files together represent 2 billion words. Huge numbers like these are hard to visualize; 1.8 billion words amount to almost 7 million pages if every page would contain 300 words, and almost 23.000 volumes if every volume would contain 300 pages; one would need about 150 of Ikea’s Billy bookcases to fit these in.
The length of the works in the corpus varies (see Figure 6); the shortest works are only a couple of lines long (a single poem, a few aḥādīth), while the largest book in the corpus, Biḥār al-Anwār, Majlisī’s encyclopaedic collection of Imamite ḥadīth, amounts to almost 12 million words. The latter work falls out of the range of our current study, since its author died in 1111 AH; the largest work in the corpus before 1000AH is Ibn ʿAsakir’s Tarikh Madinat Dimashq, with slightly under 10 million words. Both Majlisī’s work and Ibn ʿAsākir’s are outliers; no other single work in the corpus contains more than 6 million words, but the corpus does contain more than 450 text files with more than 1 million words (203 distinct works, by 168 distinct authors). Most other works cluster in the range between 10.000 and 200.000 words.
There is a noticeable evolution over the first 9 hijrī centuries of books growing bigger with time. Whereas the median length of books from the second Islamic century in the corpus is 17,830 words (which is about 1/8 of the word count of the Qur’ān, or about the same size as the Bible book Job), by the ninth century, it is about 5 times higher at 79,286.
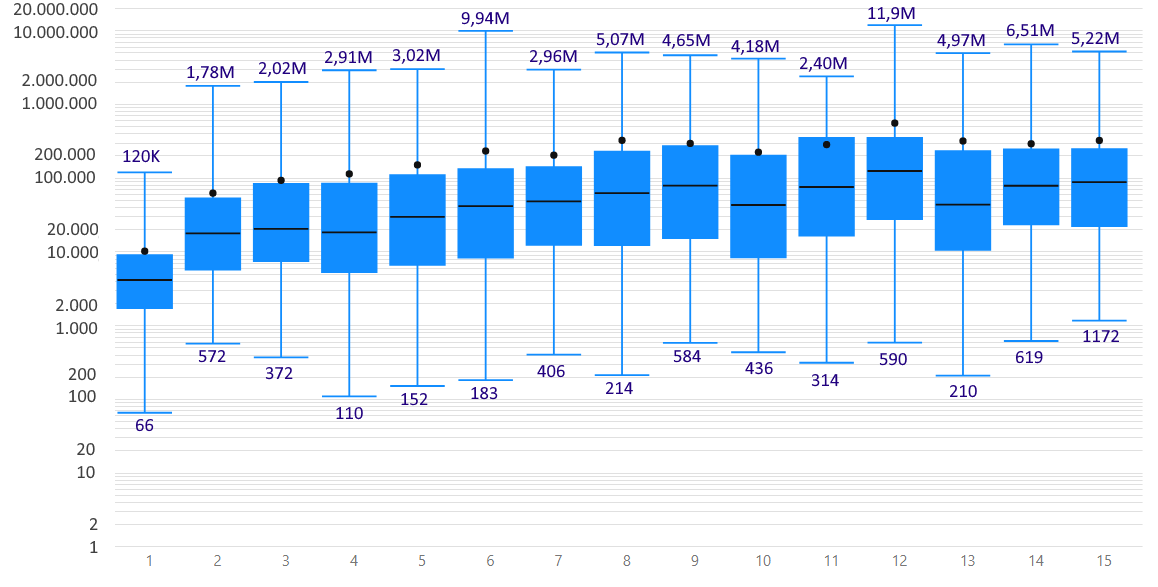
Length of the books in OpenITI, per hijrī century (attention: logarithmic scale!). The upper light blue horizontal line represents the longest book, the bottom one the shortest book; the number of words of the longest and shortest book are given (K=1,000, M=1,000,000). The blue box represents the middle two quartiles (separated by the median line, in black): half of the books in this century have a length that fits in this box. The black dot represents the average length of books in that century. (data: Dec. 2020)
The texts in OpenITI come from a variety of sources. The overwhelming majority of texts (8431 texts) were scraped from 12 digital text collections; a small but growing number were digitized by the KITAB team by manual transcription or using OCR (26 texts) or provided by users of OpenITI (19 texts):
| COUNT | ID | FULL NAME | LINK | SHORT DESCRIPTION |
|---|---|---|---|---|
| 3635 | Shamela | al-Maktaba al-Shāmila | shamela.ws | Large digital open-access library, scraped ca. 2014 (official version) |
| 125 | Sham19Y | al-Maktaba al-Shāmila (2019 additions) | shamela.ws | Additional scrape of new texts in October 2019 (official version) |
| 2308 | JK | al-Jāmiʿ al-kabīr | Books digitized by Jordanian publisher Markaz al-Turāth | |
| 1041 | Shia | al-Maktaba al-Shīʿiyya | shiaonlinelibrary.com | Text collection by the Ayatollah Milani Foundation |
| 530 | ShamAY | (gift) | Official version of al-Maktaba al-Shāmila + private collection of digitized books | |
| 394 | Zaydiyya | al-Maktaba al-Shāmila al-Zaydiyya | Collection of Zaydī texts, packaged in a Maktaba Shamela instance | |
| 132 | ShamIbadiyya | al-Maktaba al-Shāmila al-Ibāḍiyya | archive.org/details/5_20190723 | Collection of Ibāḍī texts by the Algerian Jamʿiyyat al-Turāth, packaged in a Maktaba Shamela instance |
| 99 | GRAR | Graeco-Arabic Studies Corpus | graeco-arabic-studies.org | A Digital Corpus for Graeco-Arabic Studies |
| 81 | Tafsir | al-Tafāsīr | altafsir.com | Collection of Qur'ān commentaries by the Jordanian “Royal Aal al-Bayt Institute for Islamic Thought” |
| 77 | Sham30K | al-Maktaba al-Shāmila (30.000 texts) | archive.org/details/SHAMELH30-1-20 | Official version of al-Maktaba al-Shamela + large amount of additional texts |
| 4 | Filaha | The Filāḥa Project | filaha.org/ | Arabic books on husbandry |
| 1 | Hindawi | Hindawi | hindawi.org/books/ | Books published by the Hindawi Foundation |
| 1 | BibleCorpus | Bible Corpus | github.com/christos-c/bible-corpus | A multilingual parallel corpus of Bible translations |
4290 out of the 5104 distinct works in OpenITI derive from three main source collections (Sham, JK and ShiaOL). These three collections overlap to a significant extent. While only a small number of books, less than 10 percent of the 4290, are represented in all three collections, almost half of the books are represented in more than one collection.
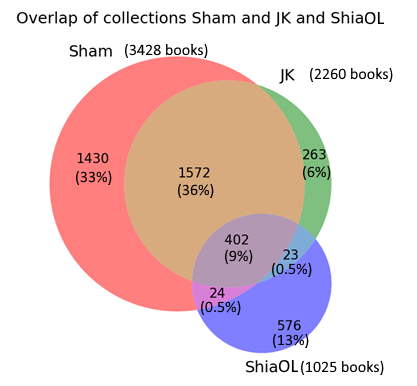
Overlap of the main source collections of OpenITI: al-Maktaba al-Shāmila (Sham), al-Jāmiʿ al-Kabīr (JK), ShiaOnlineLibrary (ShiaOL).
TO DO: genre breakdown
Further reading
2. Structure and organization of the OpenITI GitHub
The OpenITI GitHub page contains a large number of repositories, which can be divided into several groups:
-
Text files, along with metadata on each author, book and version; these are organized in repositories that each cover a chronological period of 25AH lunar years. The names of the text repositories look like this: 0025AH, 0050AH (the number being the last year in the period for which it contains the texts)
-
Working repositories: these contain data for the maintenance and development of OpenITI. The most important working repository is the Annotation repo.
-
Instantiation repositories: these repositories contain special versions of the corpus, prepared for specific applications (e.g., istylo, an instantiation of the corpus for use with the R library stylo). These repos all start with a prefix “i”.
Text repositories
25-years folders
The entire corpus is divided into a series of repositories. Each
repository covers a chronological period of 25AH lunar years:
1) the main folder within each repository is data, which contains subfolders
for each author who died within a given period;
2) each author’s subfolder includes subfolders for this author’s books (often in multiple
versions). For example, the repository 0525AH includes authors whose
death dates fall in the range of 501–525 AH).
Below is an example of how al-Ġazālī’s Iḥyāʾ ʿulūm al-dīn fits into the corpus.
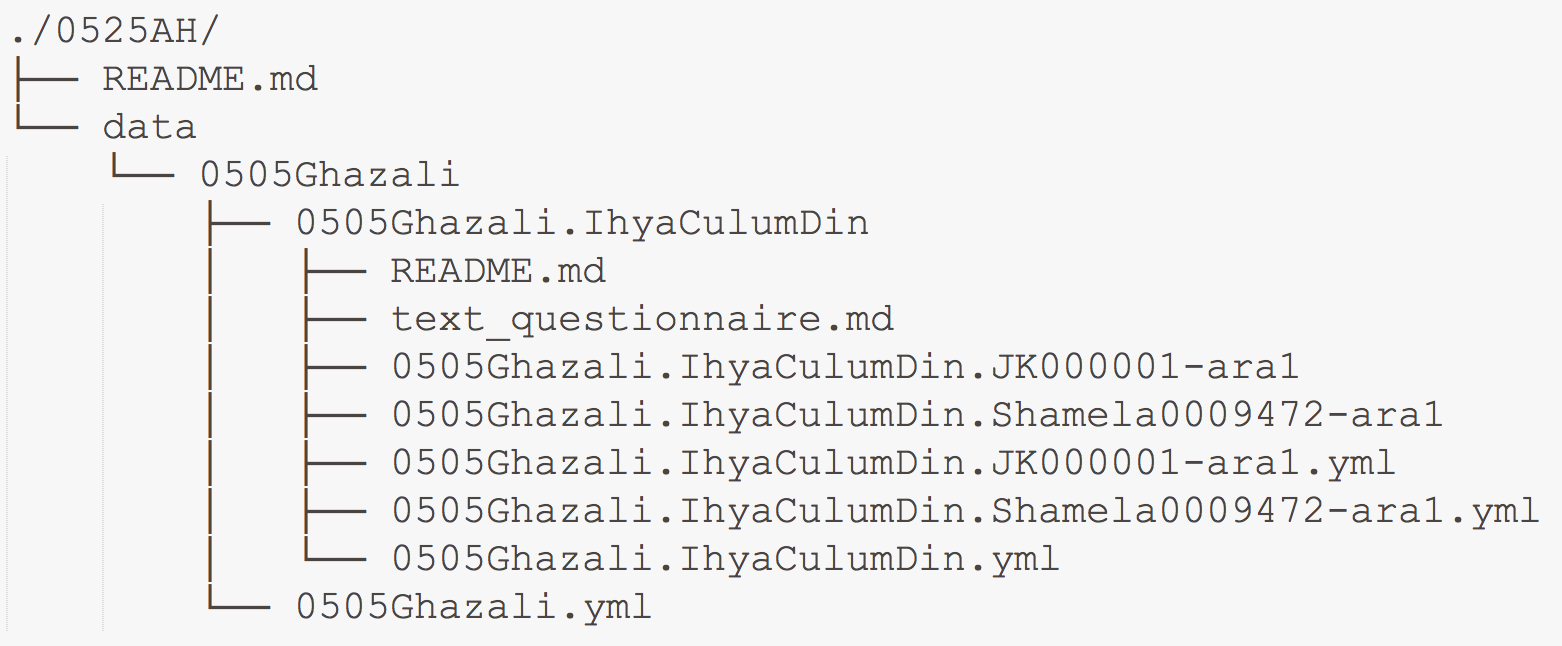
From this example, you can see that the repository 0525AH includes a
subfolder data, which includes a subfolder with al-Ġazālī’s URI,
0505Ghazali, which then includes a subfolder with Iḥyāʾ ʿulūm al-dīn’s URI
(uniform resource identifier), 0505Ghazali.IhyaCulumDin, which then
includes all the relevant files.
NB: README.md files contain some technical descriptions; *.yml files contain machine-readable metadata (On these metadata files see the description of YAML files below).
URIs & CTS-Like Folder Structure
OpenITI URIs are CTS-compliant and constructed hierarchically, by chaining together sub-URIs. To make this example more understandable in the context of OpenITI, let’s take a look at a practical example of al-Ḏahabī’s Taʾrīḫ al-islām below.
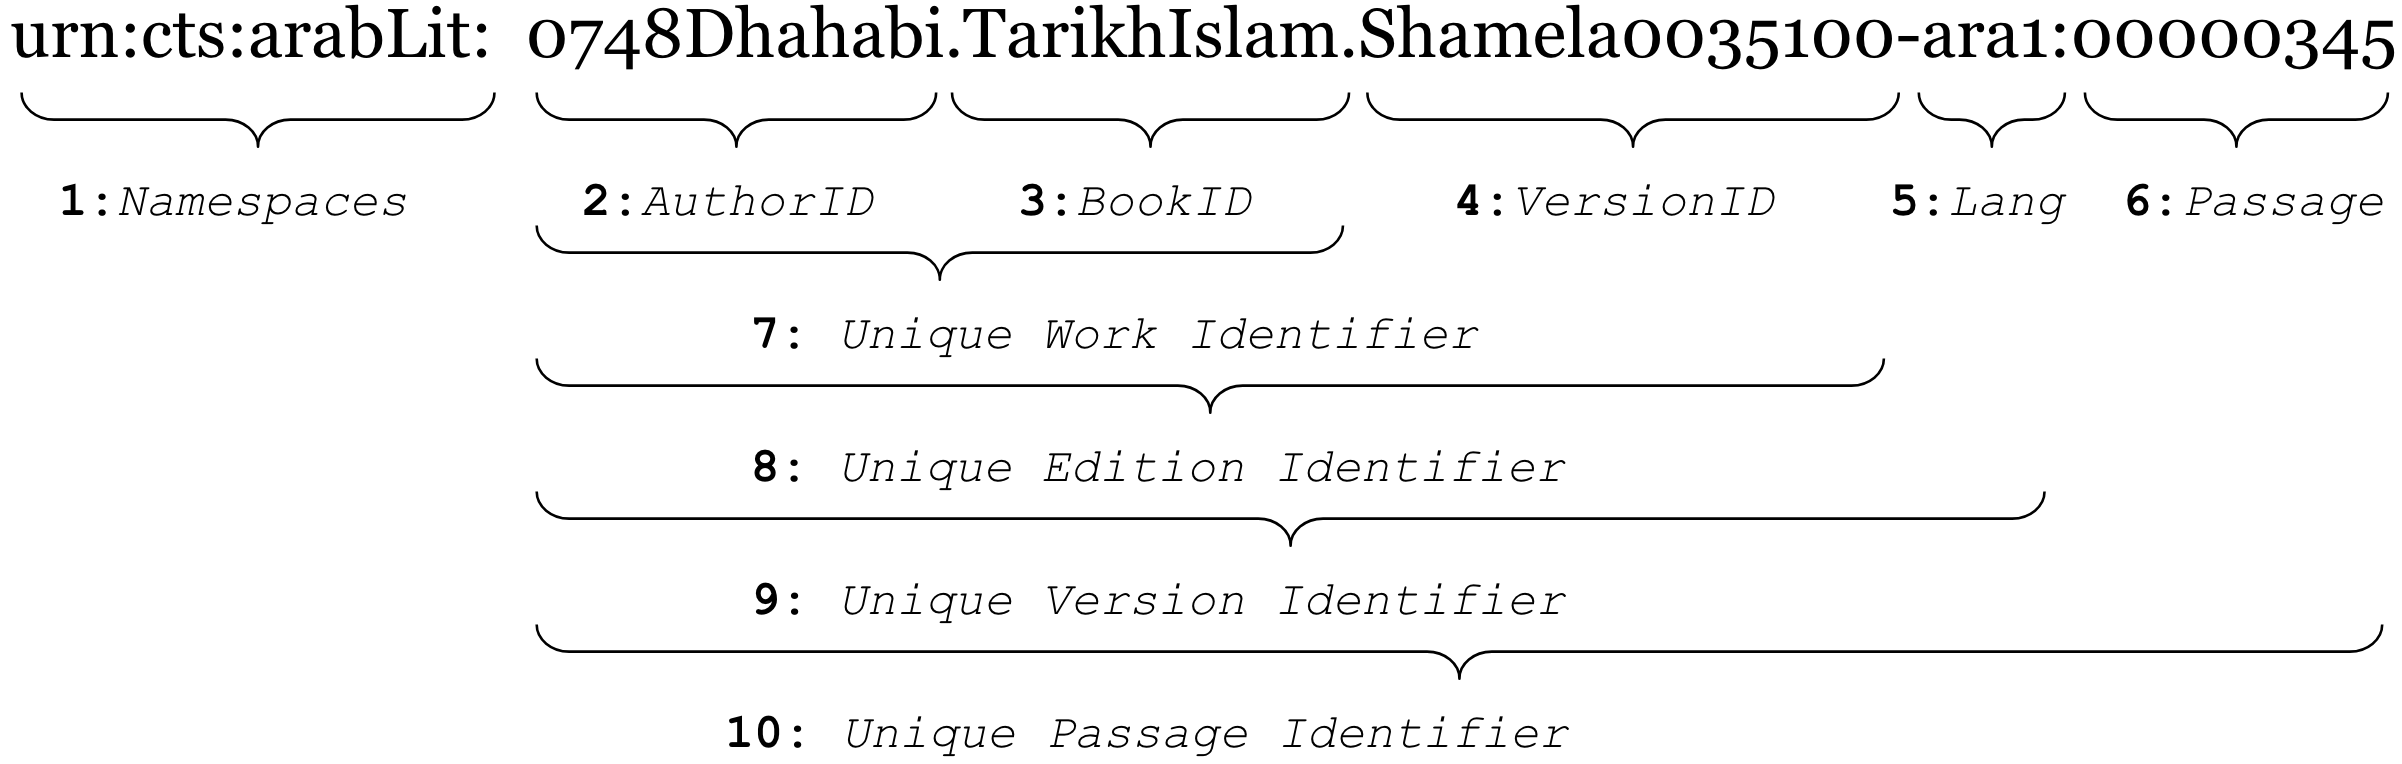
-
Namespaces are standard technical parameters from the CTS URN structure which, among other things, allow building and maintaining multilingual corpora.
-
AuthorID is the unique identifier for an author. As a rule, AuthorID is formed by combining (a) the hijrī year of death formatted into a 4-digit number (prepended with 0s, if necessary) and (b) the šuhra of the author, since this is usually the most recognizable element of any author’s name. The year of death in the AuthorID does not have to be exact, if any controversy exists. Even an approximate date will suffice, since it will allow you to arrange texts chronologically. Any issues regarding the year death can described in the metadata files (*.yml). In the above example,
0748Dhahabiis the identifier for Šams al-dīn al-Ḏahabī, who died in 748/1347 -
BookID is an element that identifies a book (book title), usually formed from one or two recognizable keywords from the title. Combined with the preceding elements, it becomes 7: Unique Work Identifier.
-
VersionID points to the origins of the specific version of a text and allows accommodating multiple versions of the same text. It is formed by combining the name of a digital library or collection from which the text originates with the unique number of this text in that collection. In cases when texts are provided by individuals or projects, the last name of the provider or the name of the project is used as name, while texts are numbers sequentially within the provided batch. Combined with the preceding elements it becomes 8: Unique Edition Identifier. (see below for special cases)
-
Lang indicates the main language of the text (these are ISO 639-2 codes, see Codes for the Representation of Names of Languages at the LOC website). Lang also allows one to accommodate translations of a specific version of a text. For example, the URI
0748Dhahabi.TarikhIslam.Shamela0035100-eng1would indicate an English translation of al-Ḏahabī’s Taʾrīḫ al-islām, which is based on the text represented with the URI in the example—0748Dhahabi.TarikhIslam.Shamela0035100-ara1; the number that follows the three-letter language code also allows to accommodate additional versioning. For example, the URI0748Dhahabi.TarikhIslam.Shamela0035100-eng2would represent another translation of0748Dhahabi.TarikhIslam.Shamela0035100-ara1. Combined with the preceding elements, it becomes 9: Unique Version Identifier. -
Passage is the ID of a specific text unit (like a chapter, a biography, a paragraph, etc.). Combined with the preceding elements, it becomes 10: Unique Passage Identifier.
Special cases in version IDs:
Volsat the end of the version ID: indicates that the text is a multivolume text of which every volumne in the source collection had its own ID number; in OpenITI, we join all these volumes into one file and keep only the ID number of the first volume (and addVolsto the version ID to log this)BK<number>at the end of the version ID: indicates that the text has been split off from a digital text file that contained more than one text (the BK number reflecting the order of appearance of the texts in the original file). e.g., the file Shia003459 contained two texts that were separated:- 0255Jahiz.NaqdCuthmaniyya.Shia003459BK1-ara1
- 0220AbuJacfarIskafi.NaqdCuthmaniyya.Shia003459BK2-ara1 (a commentary on the former)
A,B, … at the end of the version ID: the text file contains only part of a text that had to be split into parts because of file size limitations of GitHub repositories. E.g., 1111Majlisi.BiharAnwar.Shia001432Vols had to be split into three parts:- 1111Majlisi.BiharAnwar.Shia001432VolsA
- 1111Majlisi.BiharAnwar.Shia001432VolsB
- 1111Majlisi.BiharAnwar.Shia001432VolsC
For more information on the naming conventions of the special cases, such as large texts that spread across multiple files, please see the document here (in progress). New cases will be added to this document.
Text files: OpenITI mARkdown
-
Current description of OpenITI mARkdown @ maximromanov.github.io
-
Updating mARkdown, working document by Maxim and Peter.
-
Also, from previous discussions of logical chunking with Masoumeh.
-
Main goal: simplification of mARkdown, i.e. removing and shortening whatever can be removed and shortened.
-
Each unit of text must receive a unique ID:
-
Automatically: a random number of 12 digits
- Manually: a timestamp (YYMMDDHHMMSS); see, here:
- IDs to be stored in
-
-
-
-
mARkdownMSS, a working version --- Maxim together with Matt Miller, for Carl Ernst (UNC, Chapel Hill) and Mbaye Lo (Duke U); input is needed from Peter, Lorenz, and others)
-
Extra:
-
Basic vs. advanced annotation - with use cases? (examples are given in the general description of mARkdown)
-
DSP Dataset Preparation section 6 has a use case for semantic tagging
-
Metadata: YAML files
OpenITI contains metadata for each author, work and text version. This metadata is stored in separate metadata files in YAML format (*.yml). There are three types. For their locations see above
YML-1 (Version Record)
YML-1 Version YAML files relates to a specific version of a text, and are stored together with the text version they describe. For example, there are multiple versions of Ibn al-Jawzi’s Muntazam in the corpus, based on different editions and sourced from different digitisation projects. Each of these texts has a YML-1 file.
For example if the text file is 0597IbnJawzi.Muntazam.Shamela0012406-ara1.mARkdown, the corresponding YML file will be 0597IbnJawzi.Muntazam.Shamela0012406-ara1.yml
YML-1 files record the name of the annotator, the date of annotation and any issues encountered with the text. They also document the printed edition, upon which the text is based (80#VERS#BASED####) and the version that the annotator used to annotate the text (80#VERS#COLLATED#), usually the same version .
The following is an explanation of YML-1 fields:
| Field | Description | Example (from this file) |
|---|---|---|
| 00#VERS#CLENGTH##: | in characters (autoupdated) | 5785781 |
| 00#VERS#LENGTH###: | in words (autoupdated) | 1414455 |
| 00#VERS#URI######: | XXXShuhra.Title.Version (autoupdated) | 0597IbnJawzi.Muntazam.Shamela0012406-ara1 |
| 80#VERS#BASED####: | permalink (e.g. from worldcat) of the edition that the text is based on. | http://www.worldcat.org/oclc/1035773549 |
| 80#VERS#COLLATED#: | permalink (e.g. from worldcat) of the edition that the text that the annotator used to annotate the text - usually the same as the link above. | http://www.worldcat.org/oclc/1035773549 |
| 80#VERS#LINKS####: | Link to a location where a digital copy of the original edition (e.g. a pdf) might be found. If not using a printed version, add a permalink to the worldcat page for the book that was used. | https://archive.org/details/muntazim_tarikh_mlouk_oumm |
| 90#VERS#ANNOTATOR: | Name of the people who annotated the text | Maroussia |
| 90#VERS#COMMENT## | A free-running comment on the text | Comment inserted in metadata was removed... third level header would be meaningful to provide the text with a better structure. |
| 90#VERS#DATE#####: | YYYY-MM-DD (the date of annotation) | 2019-07-24 |
| 90#VERS#ISSUES###: | formalised issues, separated with commas | HEADERS, BIOGRAPHICAL-TAGS |
Further guidance on filling out YML-1 files
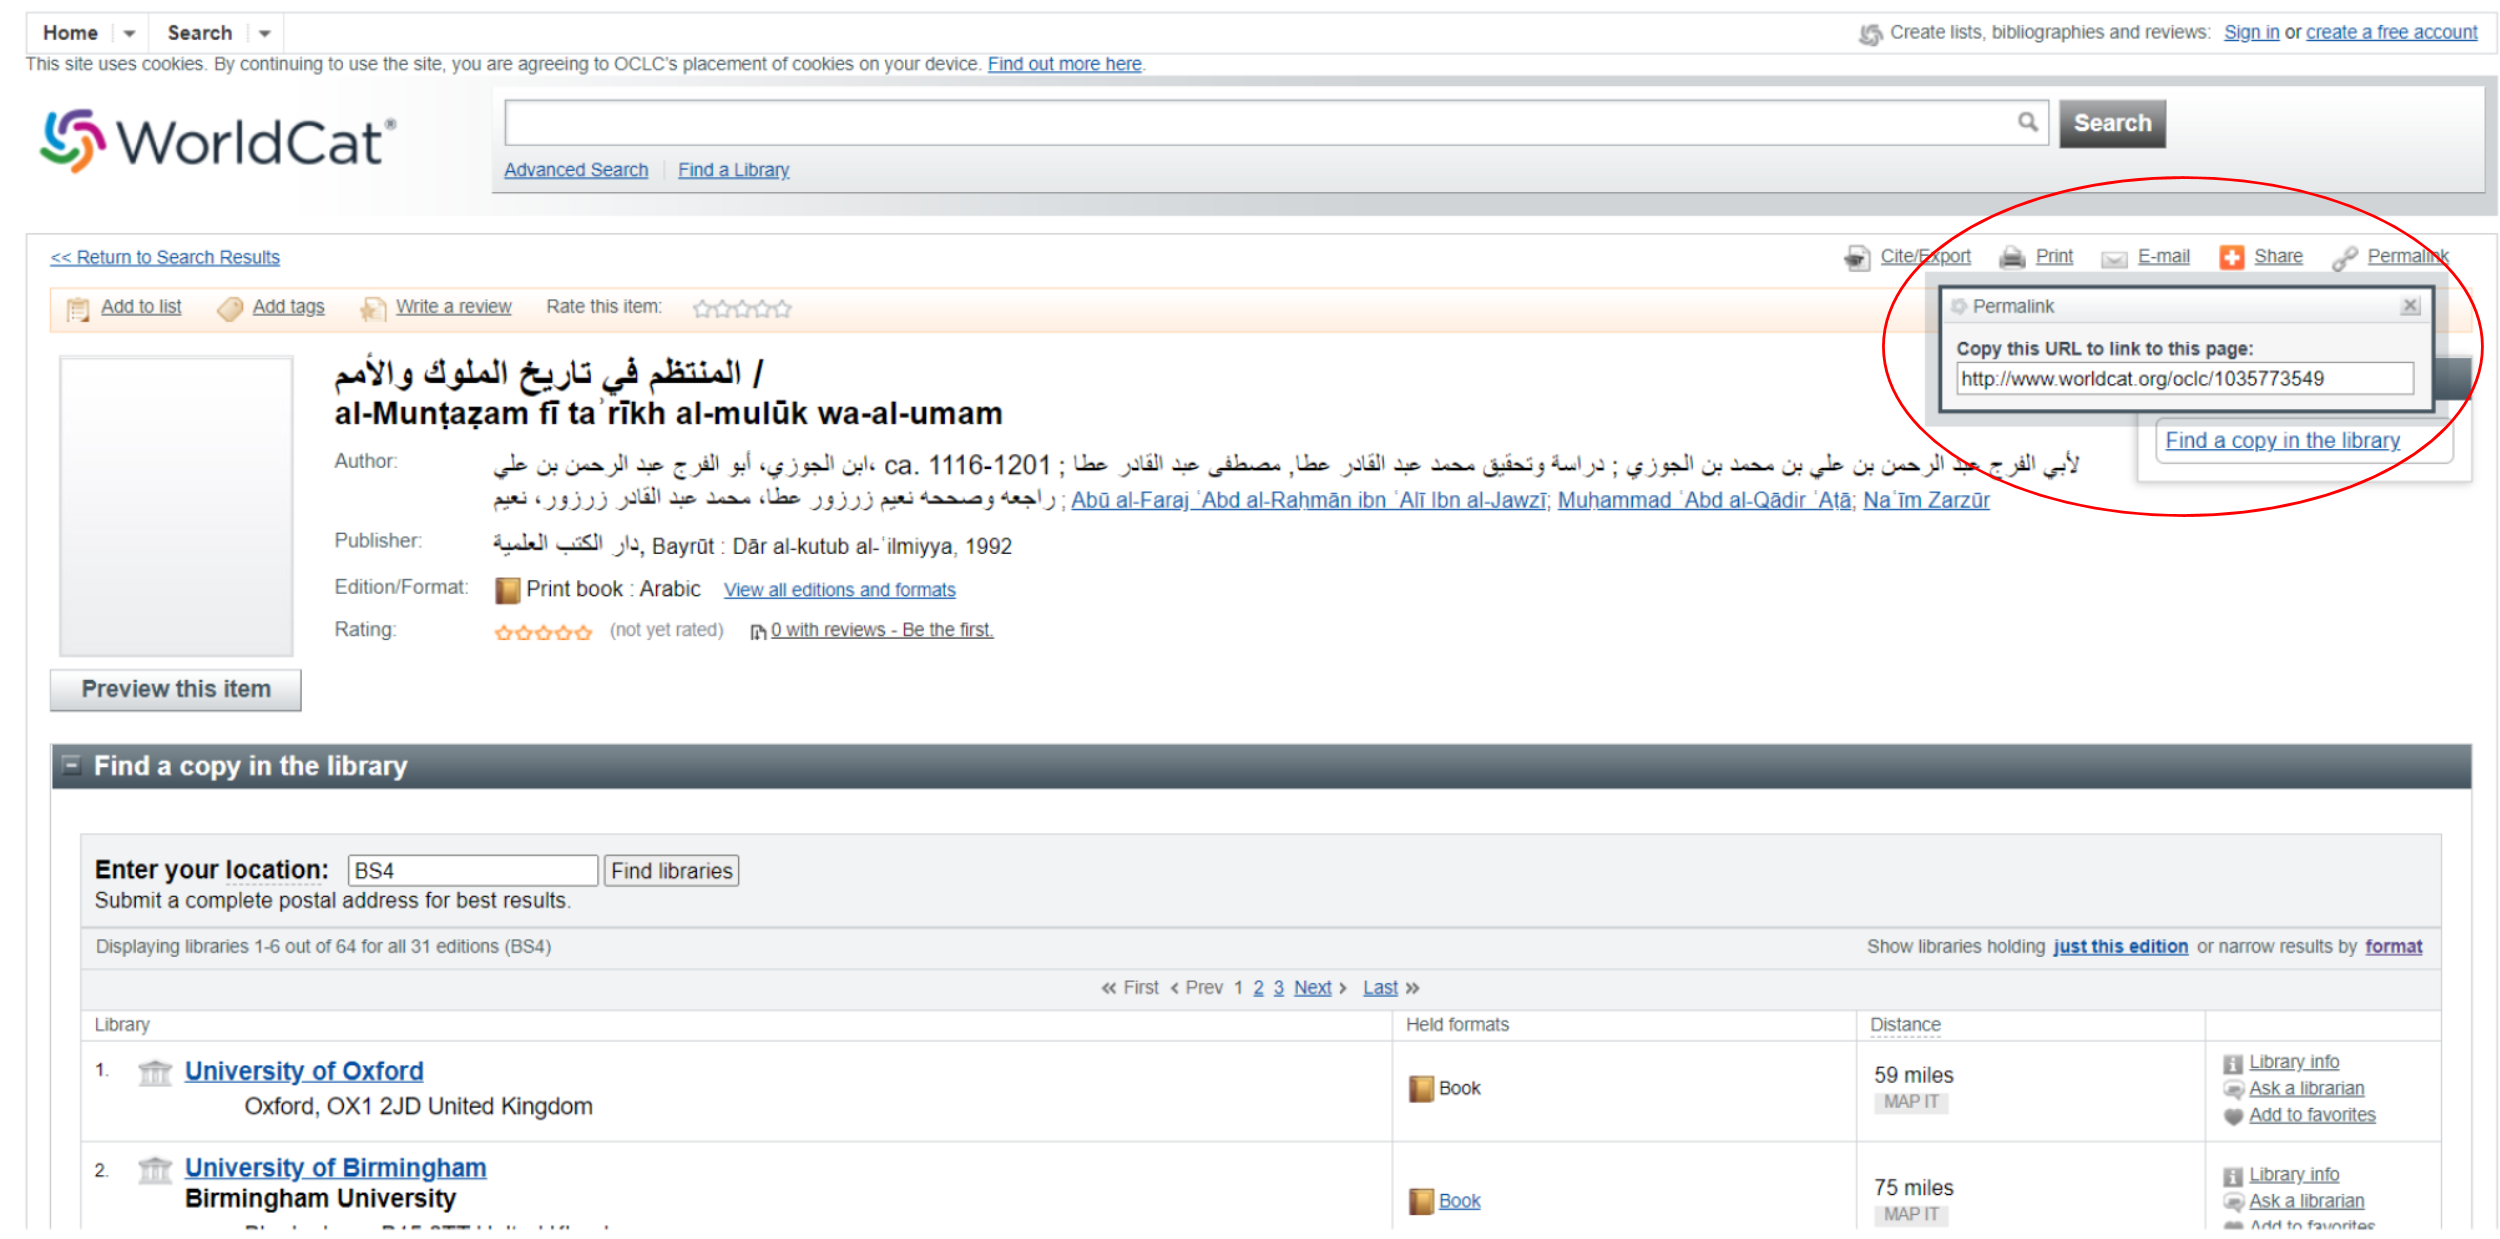
When filling out version yaml files, it is essential to use permalinks in the
fields 80#VERS#BASED#### and 80#VERS#COLLATED#, for example
from Worldcat. To get a permalink, follow these steps:
-
Go to https://www.worldcat.org
-
Search for a needed book; there are usually many records — pick the one that looks best (those submitted by major libraries are usually quite good)
-
Open that record and copy a permalink from a small pop-up window as shown on the screenshot below.
For 90#VERS#ISSUES###: there is a formalised list of issues that
can be used here:
| Tag | Description of an issue |
|---|---|
| NO_MAJOR_ISSUES | No major issues |
| PAGINATION | When pagination was not successfully implemented. |
| FOOTNOTES | When there are footnotes still in the text |
| HTML_TAGS | When there are HTML tags in the text |
| RANDOM_CHARS | Random symbols in the text (something that should be cleaned) |
| NEW_EDITION_NEEDED | The electronic text and the edition itself are of poor quality; a new version, probably based on a different edition, is needed; a candidate for the OCR platform. |
| ASSESSMENT_NEEDED | *The text is problematic in a variety of ways; perhaps, not a real text at all, but a product of editor’s imagination; requires an expert’s assessment; a candidate for removal from the corpus * |
| MISSING_PARTS | There are lines/paragraphs/verses/words in the PDF that don’t appear in the Editpro version. |
| REDUNDANT_PARTS | There are lines/paragraphs/verses/words in the Editpro version that don’t appear in the PDF (this is a bit strange but happens even when the PDF edition is exactly the same as the Editpro edition; so it has nothing to do with selecting a different edition). |
| MANY_TYPOS | A lot of typos in the Editpad Pro version. |
| REVIEW_NEEDED | *The annotator is not entirely sure about the tagging and the tagging need to be reviewed by a specialist in the field of the book (the annotator must explain the reason in the yml file and use this tag only when the whole book need to be reviewed and the problem cannot be explained by asking a simple question in the meetings. ATTENTION: use this tag as less as possible!). * |
| EDITORIAL_SECTIONS | *Anything added by modern editor(s) (the introduction of the editor(s), explanations about the manuscript or the author, indexes at the end of the book, …). These parts will be removed. * |
| INCOMPLETE_VERSION | The version contains only a part of the work (e.g., only one volume of a multi-volume edition; a manuscript transcription that does not cover all of the text). Indicate which parts of the text are present. Ideally, in the future, this will be done with CTN-style section references; for now, a description will be needed. |
| RECONSTRUCTED_TEXT | *The text is the result of a reconstruction by a modern editor, usually from quotations of a lost text in a large number of other works. * |
YML-2 (Book Record)
Each distinct work in the corpus has a YML-2 file. For example, the
YML-2 for al-Tabari’s Tahdhīb al-Āthār, would be:
310Tabari.TahdhibAthar.yml (note that the file does not include the
version part of the URI, as this file is relevant to all versions of the
book). This file provides further in-depth metadata about the book
itself.
The following is an explanation of the fields in a YML-2 file.
For an original file see: 0310Tabari.TahdhibAthar.yml
| Field | Description | Example (random, not necessarily real |
|---|---|---|
| 00#BOOK#URI######: | The URI of the book : XXXShuhra.IsmKitab (autoupdated) | 0310Tabari.TahdhibAthar |
| 10#BOOK#GENRES###: | Classification of books into forms and genres according to different sources, comma-separated. Template: src@keyword : src indicates the creator of the category and keyword indicates classification. So the example means that Brockelman’s Geschicte der arabischen Litteratur (GAL) categorises the text as hadith. |
GAL@hadith |
| 10#BOOK#TITLEA#AR: | Short title of the work, written in betacode. | Tahḏīb al-Āṯār |
| 10#BOOK#TITLEB#AR: | Full title of the work, written in betacode | Tahḏīb al-āṯār wa-tafṣīl al-ṯābit ʿan rasūl Allāh min al-aḫbār |
| 20#BOOK#WROTE####: | Locations where the work was written, using URIs from Althurayya ([https://althurayya .github.io/]{.underli ne}), comma separated. The example is the URI for Baghdad. For an explanation on getting URIs from Althurayya, see below | BAGHDAD_443E333N_S |
| 30#BOOK#WROTE##AH: | Year that the book was written (or X+ for unknown), with AH date. Format: YEAR-MON-DA | 0305-XXX-XX |
| 40#BOOK#ABRIDGED#: | If this work is an abridgement of an earlier work, enter the book URI here. Enter the author’s title if the book is not present in the OpenITI. THIS WILL BE SUBJECT TO CHANGE IN A FUTURE UPDATE TO YML FILES | |
| 40#BOOK#COMMENTD#: | If this work is a commentary on an earlier work, enter the book URI here. Enter the author’s title if the book is not present in the OpenITI. THIS WILL BE SUBJECT TO CHANGE IN A FUTURE UPDATE TO YML FILES | |
| 40#BOOK#PRECEDED#: | If we know what preceded this work, enter the book URI here. Enter the author’s title if the book is not present in the OpenITI. | |
| 40#BOOK#FOLLOWED#: | If we know what followed this work, enter the book URI here. Enter the author’s title if the book is not present in the OpenITI. | |
| 80#BOOK#EDITIONS#: | Permalink to an edition of this work, (on permalinks see explanation above.) | |
| 80#BOOK#LINKS####: | ||
| 80#BOOK#MSS######: | Permalink to a manuscript of this work. | |
| 80#BOOK#STUDIES##: | Permalink to secondary scholarship on this work. | |
| 80#BOOK#TRANSLAT#: | Permalink to a translation of this work. | |
| 90#BOOK#COMMENT##: | Comment on the work (example has been abridged, for full comment see linked file) | Work on ḥadīth, never finished by the author. The conception of the work was "to provide an exhaustive and penetrating analysis of the philological and legal implications of each ḥadīth mentioned and to discuss its meaning as well as its significance…" |
Further guidance on filling out YML-2 files
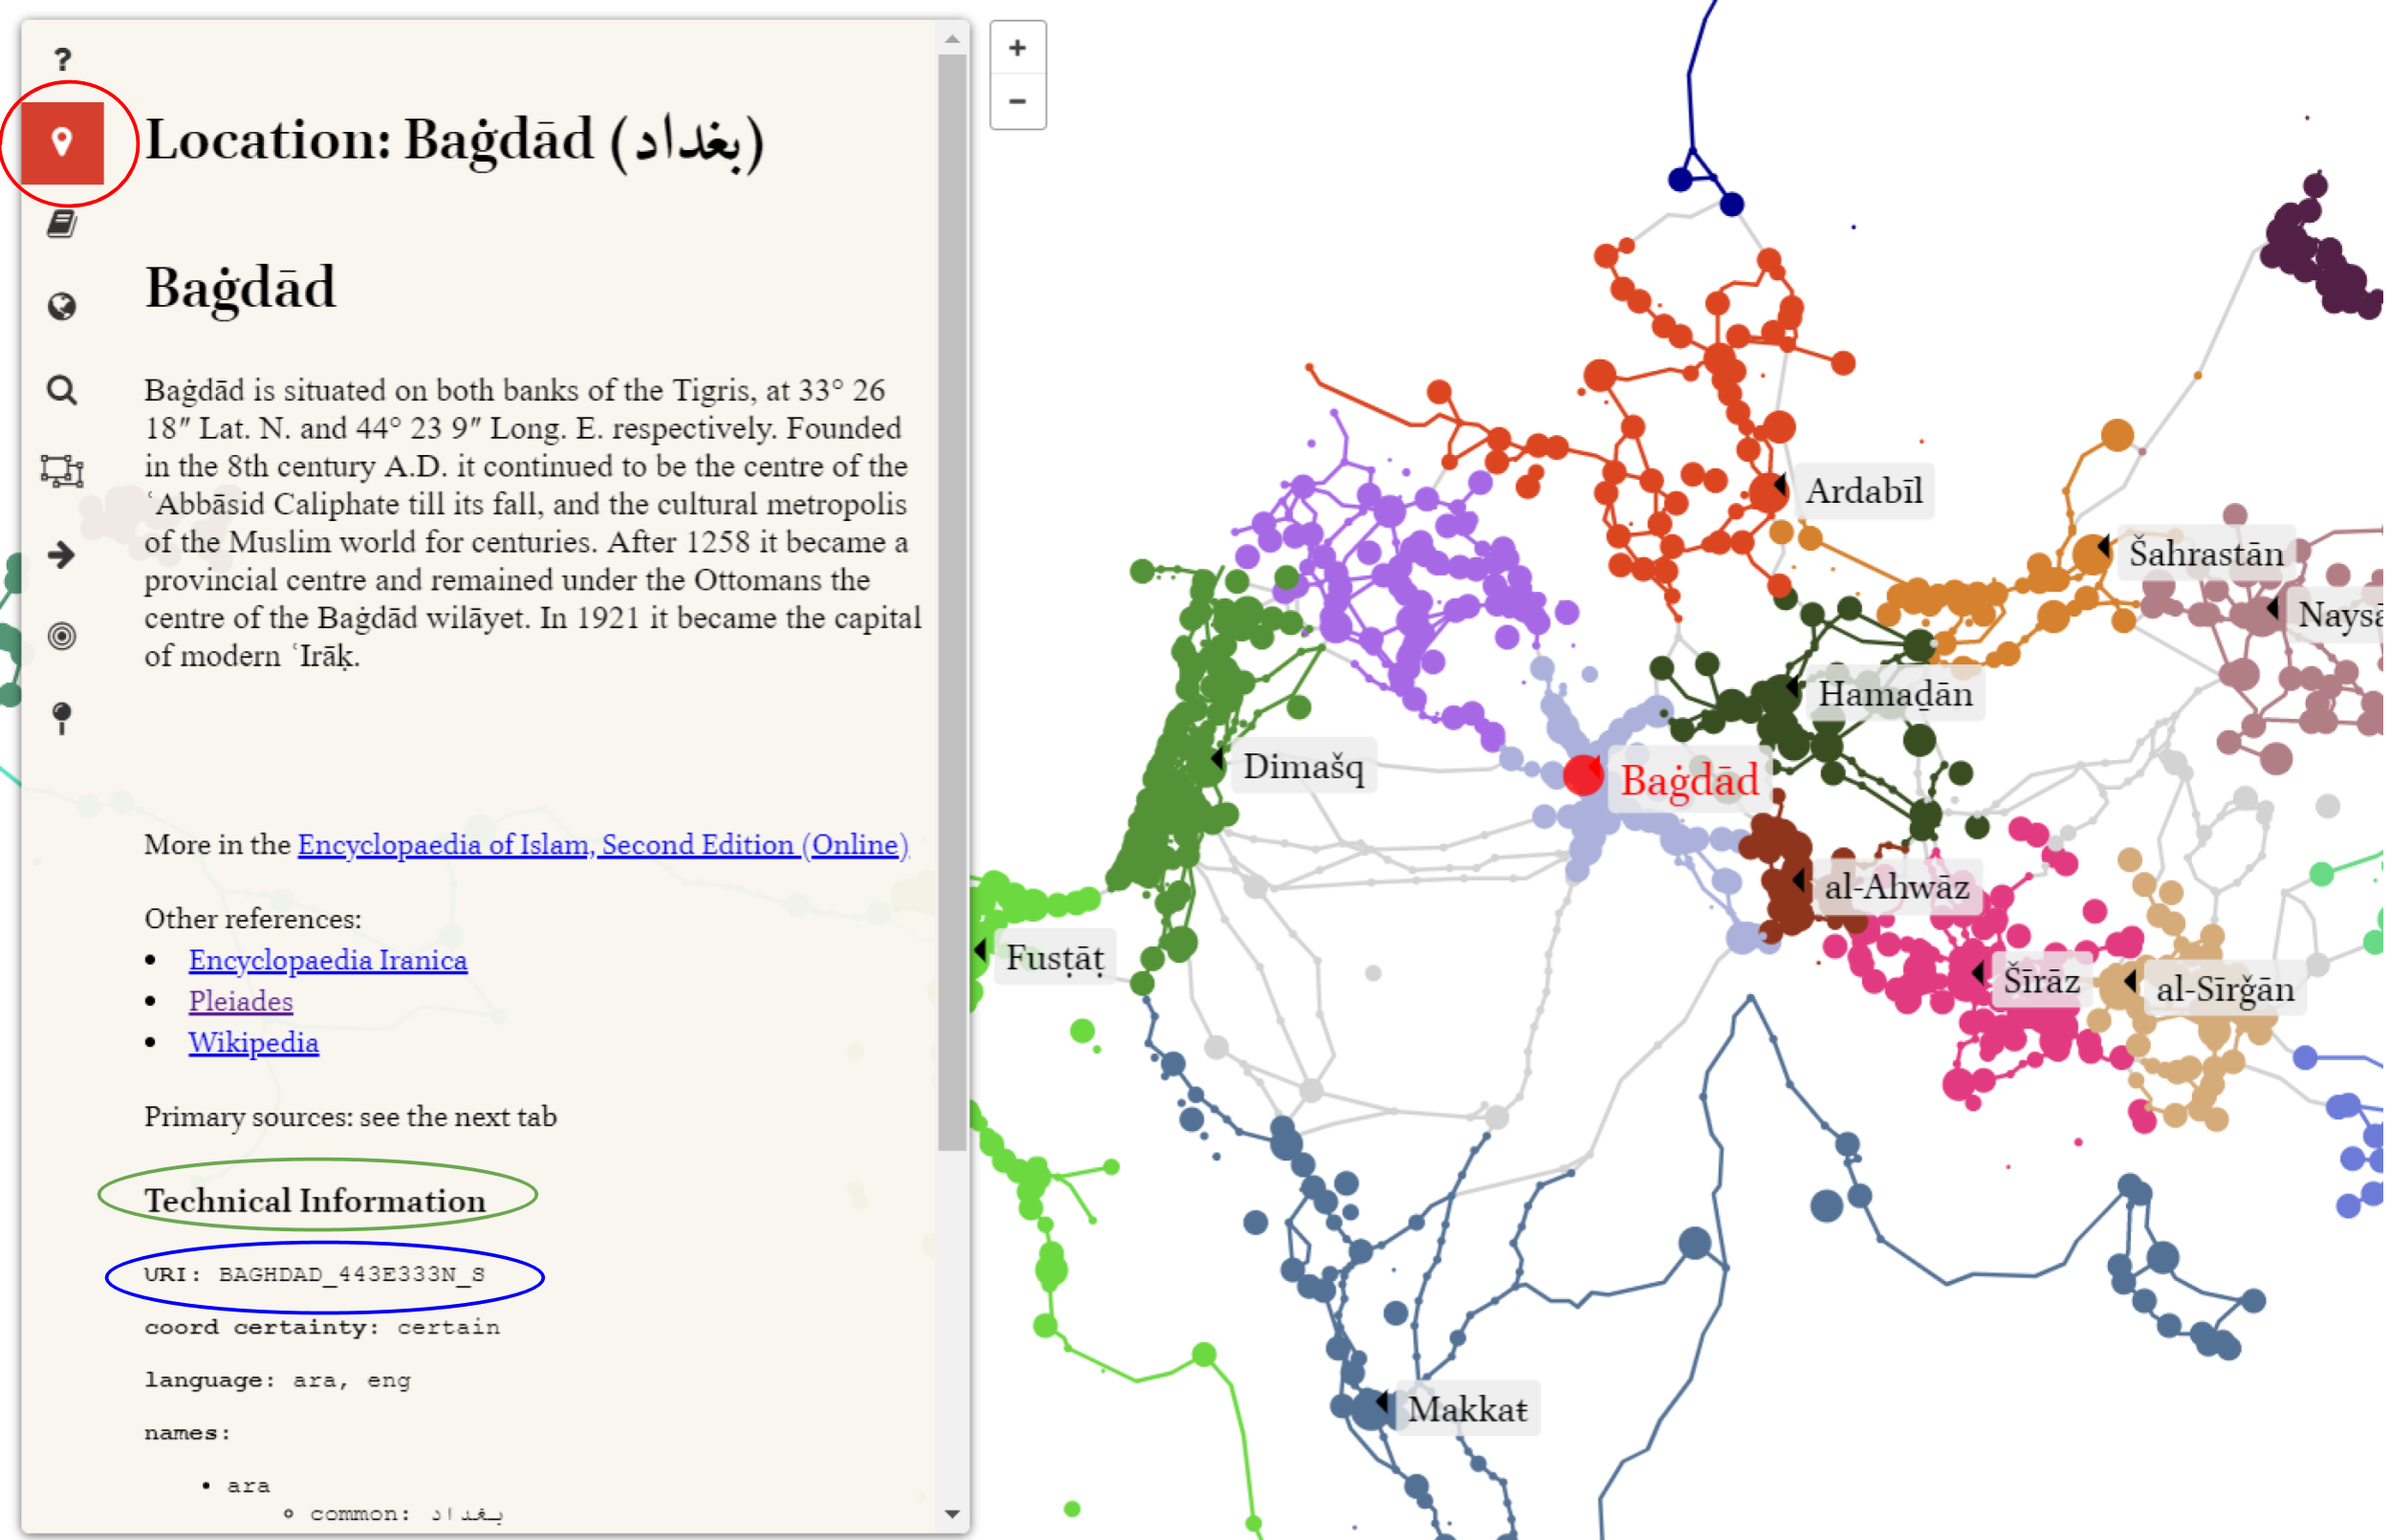
Identifying location URIs using Althurayya:
Location URIs contain all the data needed to link the texts to specific locations and the metadata associated with those locations in the Althurayya database. To identify those URIs take the following steps:
-
Go to althurayya.github.io/
-
Go to the search tab on the left.
-
Type in the place name, and select from the dropdown box.
-
Click the pin symbol (circled in red in the screenshot).
-
Click ‘Technical Information’ (circled in green in the screenshot), and the technical information will appear.
-
Copy the URI under the ‘Technical Information’ (circled in blue in the screenshot).
YML-3 (Author Record)
Each author in the corpus has a YML-3 file. The records metadata about the author and their relationship with other authors in the corpus.
The following is an explanation of the fields in a YML-3 file.
For an example of an original file see: https://github.com/OpenITI/0325AH/blob/master/data/0310Tabari/0310Tabari.yml
| Field | Description | Example (random, not necessarily real data) |
|---|---|---|
| 00#AUTH#URI###### | The unique OpenITI identifier for this author | 0310Tabari |
| 10#AUTH#ISM####AR | The author’s ism (“first name”), written in betacode. | Muḥammad |
| 10#AUTH#KUNYA##AR | The author’s kunya(s) (teknonym), written in betacode; comma-separated | Abū Ǧaʿfar |
| 10#AUTH#LAQAB##AR | The author’s laqab(s) (cognomen/agnomen/title), written in betacode; comma-separated | Tāǧ al-Dīn |
| 10#AUTH#NASAB##AR | The author’s nasab(s) (ancestry chain), written in betacode; series of patronymics (use b. for ibn, bt. for bint) | b. Ǧarīr b. Yazīd |
| 10#AUTH#NISBA##AR | The author’s nisba(s) (demonym or other designations), written in betacode; comma-separated | al-Ṭabarī |
| 10#AUTH#SHUHRA#AR | The name the author was most commonly known as, written in betacode; comma-separated | al-Ṭabarī |
| 20#AUTH#BORN##### | Place(s) where the author was born; URIs from Althurayya, comma separated | |
| 20#AUTH#DIED##### | Place(s) where the author died; URIs from Althurayya, comma separated | |
| 20#AUTH#RESIDED## | Place(s) where the author died; URIs from Althurayya, comma separated | |
| 20#AUTH#VISITED## | Place(s) the author visited; URIs from Althurayya, comma separated | |
| 30#AUTH#BORN###AH | Date when the author was born; YYYY-MMM-DD (X for unknown) | 0224-XXX-XX |
| 30#AUTH#DIED###AH | Date when the author died; YYYY-MMM-DD (X for unknown) | 0310-XXX-XX |
| 40#AUTH#STUDENTS# | List of this author’s students; author URIs from OpenITI, comma separated | |
| 40#AUTH#TEACHERS# | List of this author’s teachers; author URIs from OpenITI, comma separated | |
| 80#AUTH#BIBLIO### | Bibliography on this author; Worldcat.org links, comma-separated | |
| 90#AUTH#COMMENT## | a free running comment here; you can add as many lines as you see fit; the main goal of this comment section is to have a place to record valuable information, which is difficult to formalize into the above given categories. |
Further reading:
- original OpenITI YAML Template Overview. NB: on OpenITI gitHub; current YAML templates are slightly different
RAW folders
Many openITI texts were collected from various open-access online repositories and libraries and converted into OpenITI mARkdown format. For some of these collections, we keep the raw texts as they were collected. These texts are in their initial (raw) format and require reformatting and further integration into OpenITI. They are stored in repositories whose names start with RAW.
Working repositories
Annotation repo
The Annotation repository is created for documentation of the annotation process (see the Annotation guidelines section for description of the annotation workflow), and to keep track of the advance of the annotation of the corpus. Steps below only explain the process of selection of a text for annotation.
-
Open the priority list. It is organized chronologically and is searchable (the field with a magnifying glass that says “Search this file”).
-
Texts with priority are the ones that should be annotated. Work in chronological order. Texts up to 1000 AH are of top priority.
-
While the priority list will be updated regularly, you should check if a text is not being annotated. To do so, go to the issues tab and, in the field FILTER, search for the URI of the book that you want to annotate (use either complete URI, like 0597IbnJawzi.Muntazam, or Author's URI 0597IbnJawzi, or the title of the book like Muntazam; note: if you search for IbnJawzi nothing will be found).
-
Check results in both open and closed issues. If nothing is found, you can start working on the selected text. (git fork > git clone > annotate).
-
Before you proceed, open an issue (issues > New Issue), using the
IN PROGRESStemplate. -
After you finish annotating, send a pull request, close your
IN PROGRESSissue, and open another issue using the [Submission report (for Pull Requests) template] (https://github.com/OpenITI/Annotation/issues/new?assignees=&labels=text+tagged&template=–submission-report–for-pull-requests-.md&title=Text+tagged%3A+INSERT_FULL_URI_HERE).
Note: You can create an URGENT issue to assign specific text to a specific person. Go to (issues > New Issue > select URGENT template > Follow the instructions in the template.
Instantiations
i.xxxxx repositories are instantiations of the OpenITI corpus adapted for specific forms of analysis. At the moment, these include the following instantiations (in progress):
-
i.cex with all texts split mechanically into 300 word units, converted into cex format.
-
i.mech with all texts split mechanically into 300 word units.
-
i.logic with all texts split into logical units (chapters, sections, etc.); only tagged texts are included here (~130 texts at the moment).
-
i.passim_new_json with all texts split mechanically into 300 word units, converted for the use with new passim (JSON).
-
i.passim_old_mech with all texts split mechanically into 300 word units, converted for the use with old passim (XML, gzipped).
-
i.stylo includes all texts from OpenITI (duplicates excluded) that are renamed and slightly reformatted (Arabic orthography is simplified) for the use with stylo R-package.
-
i.farasa, an instantiation of the corpus for processing with the
- Farasa engine.
3. Working with GitHub
The development version of the corpus is hosted on the software development platform GitHub (https://github.com/OpenITI). GitHub uses the distributed version-control system Git (https://en.wikipedia.org/wiki/Git) for keeping track of changes to files on each of the different developers’ machines. GitHub also offers additional features that facilitate collaboration within the core team, collaboration with outside contributors and interaction with users.
Why use a version control system?
(adapted from https://swcarpentry.github.io/git-novice/01-basics/index.html )

Even if working alone, you quickly run into multiple versions of the same document. This problem is compounded when working in a team.
Version control systems start with a base version of the document and then record changes you make each step of the way. You can think of it as a recording of your progress: you can rewind to start at the base document and play back each change you made, eventually arriving at your more recent version.
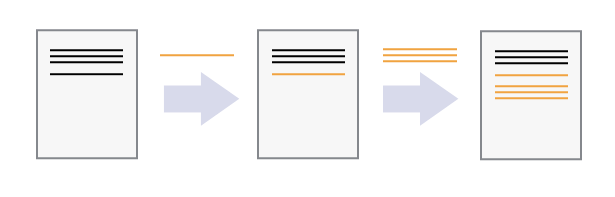
Once you think of changes as separate from the document itself, you can then think about “playing back” different sets of changes on the base document, ultimately resulting in different versions of that document. For example, two users can make independent sets of changes on the same document.
Unless multiple users make changes to the same section of the document - a conflict - you can incorporate two sets of changes into the same base document.
A version control system is a tool that keeps track of these changes for us, effectively creating different versions of our files. It allows us to decide which changes will be made to the next version (each record of these changes is called a commit), and keeps useful metadata about them. The complete history of commits for a particular project and their metadata make up a repository. Repositories can be kept in sync across different computers, facilitating collaboration among different people.
GitHub uses the version-control system Git (https://en.wikipedia.org/wiki/Git). Git is called a “distributed” version-control system because the change history of a repository is maintained not only on a central server, but also in each copy of the repository.
Getting started with GitHub
Create a GitHub account
If you don’t have a GitHub account, you will have to create one.
Go to Github.com/join and go through the sign-up process.
Installing Git
On Windows
(instructions from https://www.pluralsight.com/guides/using-git-and-github-on-windows)
Download Git for windows here: https://gitforwindows.org/
Execute the downloaded file. In the page Select Components you can leave the options at their defaults.
The Windows Explorer integration > Context menu entries option allows opening the Git command prompt (Git Bash) from any folder by clicking with the right mouse button on the folder and selecting Git Bash Here. The last option is also interesting in that it installs a better font for all console windows.
On the next screen (Adjusting your path environment), choose the most conservative option: Use Git Bash only. This will make git commands available only in Git Bash and will not alter your PATH variable. Click Next.
Another important setting: line endings. As you may know, Windows and Unix systems (Linux, Mac) have different formats of line breaks on text files. If you write a file with Windows line breaks, another person may have problems opening that file in Linux and vice-versa. The line endings setting allows you to normalize this. Choosing the second option (Checkout as-is, commit Unix-style line endings), that won't change the line breaks when the file arrives but will convert them to Unix-style when you commit. That way, you don't risk committing Windows-style line breaks and everything is kept in Unix-style. Don't worry, even though you are in Windows, most of the text editors can read Unix line breaks just fine.
After that one more Next, Finish, and Git is installed!
On Mac
The easiest way to install git on Mac is by using homebrew, a package installer for Mac.
- Open Terminal by opening Finder, and then clicking Applications > Utilities > Terminal (alternatively, you can use Spotlight to find Terminal: press the command and space keys on your keyboard and start typing Terminal; click Terminal in the search results to open the program)
- write the following command in the Terminal:
brew install git - now also install the git credential manager using this command:
brew install --cask git-credential-manager. The script may ask you for your (Mac) password. Provide it to proceed with the installation
NB: If you do not have homebrew yet, install it first (instructions from here:
Paste this command into your terminal: /bin/bash -c "$(curl -fsSL https://raw.githubusercontent.com/Homebrew/install/HEAD/install.sh)"
The script explains what it will do and then pauses before it does it. You should now be able to use homebrew to install git, as described above.
Activating bash in Terminal on Mac There are multiple command line systems, each with their own grammar and lexicon; these systems are often referred to as “shells.” We are going to use one such shell called bash.
On older Mac operation systems (prior to MacOS Catalina (2019)), Terminal uses bash by default; for more recent operation systems, we will have to make bash the default.
- Open Terminal by opening Finder, and then clicking Applications > Utilities > Terminal (alternatively, you can use Spotlight to find Terminal: press the command and space keys on your keyboard and start typing Terminal; click Terminal in the search results to open the program).
- The Terminal program will open, containing two lines of text. The last character you see is called the “prompt”: it prompts you to write commands. If the prompt is the
$character, you’re all set: Terminal is already using bash. - If the prompt is the
%character, you’ll have to type the following command after that%:chsh -s /bin/bashand then press Enter to execute the command. Terminal will ask you for your password; type it (you won’t see it appear, for security reasons) and press Enter again. Close and reopen Terminal; the prompt should now be a$
On Linux
(instructions from https://www.atlassian.com/git/tutorials/install-git#linux)
From your shell, install Git using apt-get:
$ sudo apt-get update
$ sudo apt-get install git
Introducing your main git tool: Git Bash
On Windows
We interact with Git through a program called Git Bash, which was installed together with Git in the step above. Git Bash is a command line program, which means you interact with it not by clicking buttons with your mouse but by writing commands. Only the thought of this may repulse many humanities scholars, but fear not: it is easy to learn, and we need only very few commands.
To open Git Bash, right-click on a folder in Windows Explorer, and choose “Git Bash here”
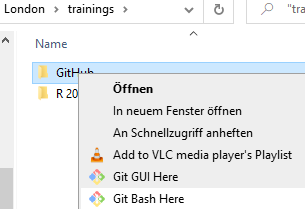
This will open the program:

“d/London/trainings/GitHub” shows the location of our working directory, where we opened the program; the dollar sign indicates that we can write a command, and it will be executed in our working directory.
NB: In this documentation, we will include the dollar sign before every line that should be executed in Git Bash; you don’t have to write it in Git Bash when copying commands from this document. In order to execute a command, press the “Enter” key.
Useful commands:
-
cd(for “change directory”):- move to another folder by writing the path to it (which is the
chain of folders that connects that folder to your current
working directory):
$ cd path/to/my/folder - To move to the parent folder (which is the folder above your
current working directory): use
cd ..
- move to another folder by writing the path to it (which is the
chain of folders that connects that folder to your current
working directory):
-
ls(for “list”): list all files and folders in a directory (folder).- List all files and folders in the current working directory:
$ ls - List all files and folders in another directory:
$ ls path/to/my/folder
- List all files and folders in the current working directory:
On Mac
If you are a Mac user, you are probably familiar with the standard Mac command line tool, Terminal. You can use Terminal to interact with Git, or install a dedicated command line tool for Git:
To open Terminal, do one of the following:
-
Click the Launchpad icon
 in the Dock, type “Terminal” in the
search field, then click “Terminal”.
in the Dock, type “Terminal” in the
search field, then click “Terminal”. -
In the Finder
 , open the /Applications/Utilities
folder, then double-click “Terminal”.
, open the /Applications/Utilities
folder, then double-click “Terminal”.
On Linux
If you’re using Linux, you don’t have to download the Git Bash program;
you can use the normal shell to interact with Git. You can use all
normal Linux commands (cd, ls, …), in addition to a number of
additional git commands that will be explained below.
Working with OpenITI text repositories
Create your personal copy of an OpenITI repo: Forking
To work on an OpenITI repository as an external contributor, you first have to create your personal copy of that repository. This process is called “forking” (the image is that of a tree, in which a new branch forks off from the trunk - nothing to do with cutlery).
-
Make sure you are logged in on GitHub
-
Select a text repository (0025AH, 0050AH, 0075AH, …); you can search the repositories using the “Find a repository” search box
-
On the repository page, click the “Fork” button (in the upper right corner):

-
If GitHub asks you where to fork the repository to, choose the option with your GitHub username.
-
You will now be transferred to a new repository on your personal GitHub page that contains an exact copy of the repository you forked; its URL will look something like: https://github.com/<yourUsername>/<year>AH
Create a copy of your OpenITI fork on your computer: Cloning
Now you have a fork of an OpenITI repository on your own GitHub page, you can download it on your computer so you can work on it.
-
Go to the fork you just created on GitHub (https://github.com/<yourUsername>/<year>AH)
-
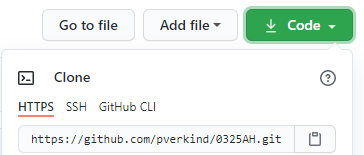
Click the green “Code” button, and then click the clipboard icon next to the URL to copy the URL to your clipboard:
-
On your computer, create a folder where you will keep all your OpenITI repositories
-
Open Git Bash (on Mac: Terminal, on Linux: a shell) in that folder
- Type the command
git cloneand paste the link (for Windows users: use shift+insert, ctrl+v does not work in Git Bash):$ git clone https://github.com/<yourUsername\>/<year\>.git -
Git will now download all files and folders from your clone to your computer. This may take some time if you forked a large repository.
-
After the cloning process is done, you can use the command
lsto show all files and folders in your current working directory; it will show you that the new repository was added:
-
Now use the command
ls -afollowed by the name of the repository (the-ais a “flag” that tells the program to also show hidden files):
The
.git/folder contains the change history of the repository; thedata/folder contains the text files. - You can now read the text files in the repository, make changes to them, etc.
Keep up to date with OpenITI: pull changes
Set up a direct connection between your local repo and the one on OpenITI’s GitHub page
OpenITI has many contributors. In order to make sure that your copy (“fork”) of an OpenITI repository remains up to date with the original one on the OpenITI GitHub page, we create a connection between the copy on your local machine and the repo on OpenITI.
You will need to make this connection of your local repository to the upstream repo only once.
Each copy of a repository can be given a name. By default, the name
origin is used for the repository you cloned (the one on your personal
GitHub page). You can check this by going into the root folder of your
repository, and writing the command remote -v. This will list all
remote repositories (that is, repositories on the internet, not locally
on your computer) linked to your local repository:

The response you see in Git Bash means that only one remote repository
is connected to your local repo: it is called origin, is located at the
given URL, and is used for both fetch and push actions (that is,
synchronizing in both directions: downloading and uploading).
We will now connect our local repository with the OpenITI repository from which you created your fork.
-
Go to the OpenITI GitHub page and copy the link from the original repo again, as you did before, by clicking the green
Codebutton and then clicking the icon next to the URL: - In Git Bash on your computer, use the cd command to move into your
local repository:
$ cd D:/London/trainings/GitHub/0325AH - Write the command
git remote add upstreamfollowed by the copied link:$ git remote add upstream https://github.com/OpenITI/0325AH.gitNB:
upstreamis only a name and could be replaced with any other name; but it is accepted practice to call the repository from which you clonedupstream, so best to stick with that! -
Check whether this worked by writing the command
git remote -vagain:
You see a new remote repository has been added: it is called
upstream, is located at the URL you copied, and can be used for synchronizing in both directions. NB: Even though git indicates here that you can send (“push”) your local changes to the upstream repository, GitHub will not allow you to push your changes directly to the upstream repository. This is a safety measure by the GitHub website to protect the online repos from malicious changes. Instead of pushing your changes directly to the upstream repository, you will have to make a pull request: ask permission from the owner of the upstream repo to push your changes. See below.
Synchronize your local repository with the “upstream” repo
Since many people are working on the OpenITI corpus, it is important that every time you start work inside a repo, you first synchronize it with the upstream repository, so that your local repo contains all changes made by other users on the OpenITI GitHub page.
NB: GitHub uses the image of “pushing” and “pulling” for synchronization of changes between repositories: you “pull” changes from a remote repository to your local repository, and you can “push” your own changes from your local repo to a remote repository.
-
We can synchronize our local repository with the upstream repository (in case another user made changes to the repo) using the following command:
$ git pull upstream masterNB:
upstreamis the name we have given to the original version of the repo we forked, on the OpenITI GitHub page;masteris the name of a branch within this repo. Branches are an important concept in Git (see here if you want to learn more), but in OpenITI text repositories, we only use themasterbranch, so don’t worry about this. -
If no changes were made to the upstream repo (by another user) since you forked it, Git will respond with a message “already up to date”. If changes have been made, Git will try to merge both versions of the repo, and will bring up an editor window that says it wants to create a commit message that states that both versions were merged. Press
Ctrl+SandCtrl+Xto save and close this message.NB: if you have made changes to a file on your own computer, and someone else has meanwhile made changes in the upstream repo to the same line in that same file, this leads to a “merge conflict”: Git cannot decide which change to keep. You will have to resolve this merge conflict by manually selecting which changes to keep: the one you pulled from the OpenITI GitHub page, or the one you made locally. This can be a huge pain. In order to avoid this, always make sure to pull the changes from the upstream repository before you make any change to your local files!
Save your changes: add and commit
There are many ways to contribute to OpenITI: you can add mARkdown annotations to texts, update metadata in yml files, correct a typo you have found, etc.
Whenever you have made a change to a file in your local repo, you have to notify Git that you did so. It is the Git equivalent of using “save as”. Git stores changes you made in files known as “commits”; each commit has a unique id number, and a label (“commit message”) that describes in about 50 characters what changed to the repository when this commit was made. This allows a user to go back in the history of the repository, for example to return to earlier versions of a file.
-
Make sure you have saved and closed the files you changed.
-
In Git Bash on your computer, use the cd command to move into your local repository:
$ cd D:/London/trainings/GitHub/0325AH -
You can use the command
git statusto make Git check which files in your local repository have undergone changes:$ git statusIf no changes occurred, you will get the following message:
 On branch master
 Your branch is up to date with \'origin/master\'.
 nothing to commit, working tree clean
If you have made changes, Git will return a list of the files that have been changed (or added):
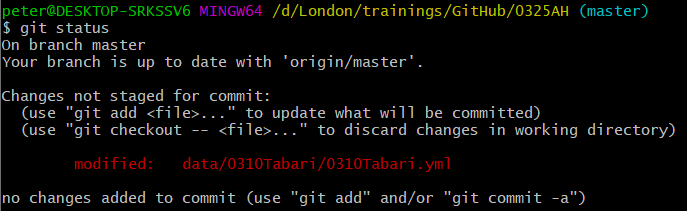
For this example, we have changed the metadata about the life of the author al-Ṭabarī in his author yml file. Git displays it in red to show that the changes to this file have not yet been stored in Git.
-
A commit is like a box in which changes are saved. First you have to add the changes to the box using the “git add” command, followed by the path to the files you changed. In this example, we changed the yml file of the author al-Ṭabarī:
$ git add data/0310Tabari/0310Tabari.yml -
If you use the “git status” command again, you will see that the file we changed is now displayed in green: the changes are in the commit box, ready to be committed to the storage system.

-
Using the command
git commit, we will commit our changes to the storage system. For later reference, we have to add a “commit message”: a label to the commit box, so to say, that should help other users to understand the changes you made to the file without having to compare both files.
NB: a good commit message should be around 50 characters long, be descriptive, and in the imperative mood: the idea is that when you go through the history of changes made to a repo from the start, you can read the commit message as “when you execute this commit, Git will…”
-
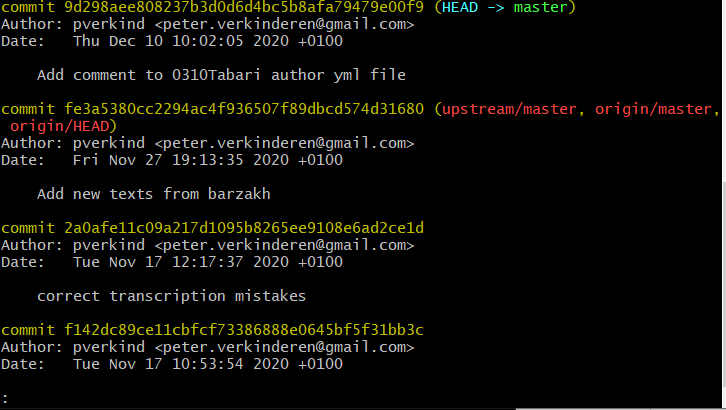
Your changes have now been included in the change history. You can view the change history with the command
git log:$ git logThis will open an editor within Git Bash that will show you a log of all commits made to the repo, from the most recent to the earliest. You can use the UP and DOWN arrows on your keyboard to navigate through this history. To quit the log, type “q” after the colon at the bottom of the window.
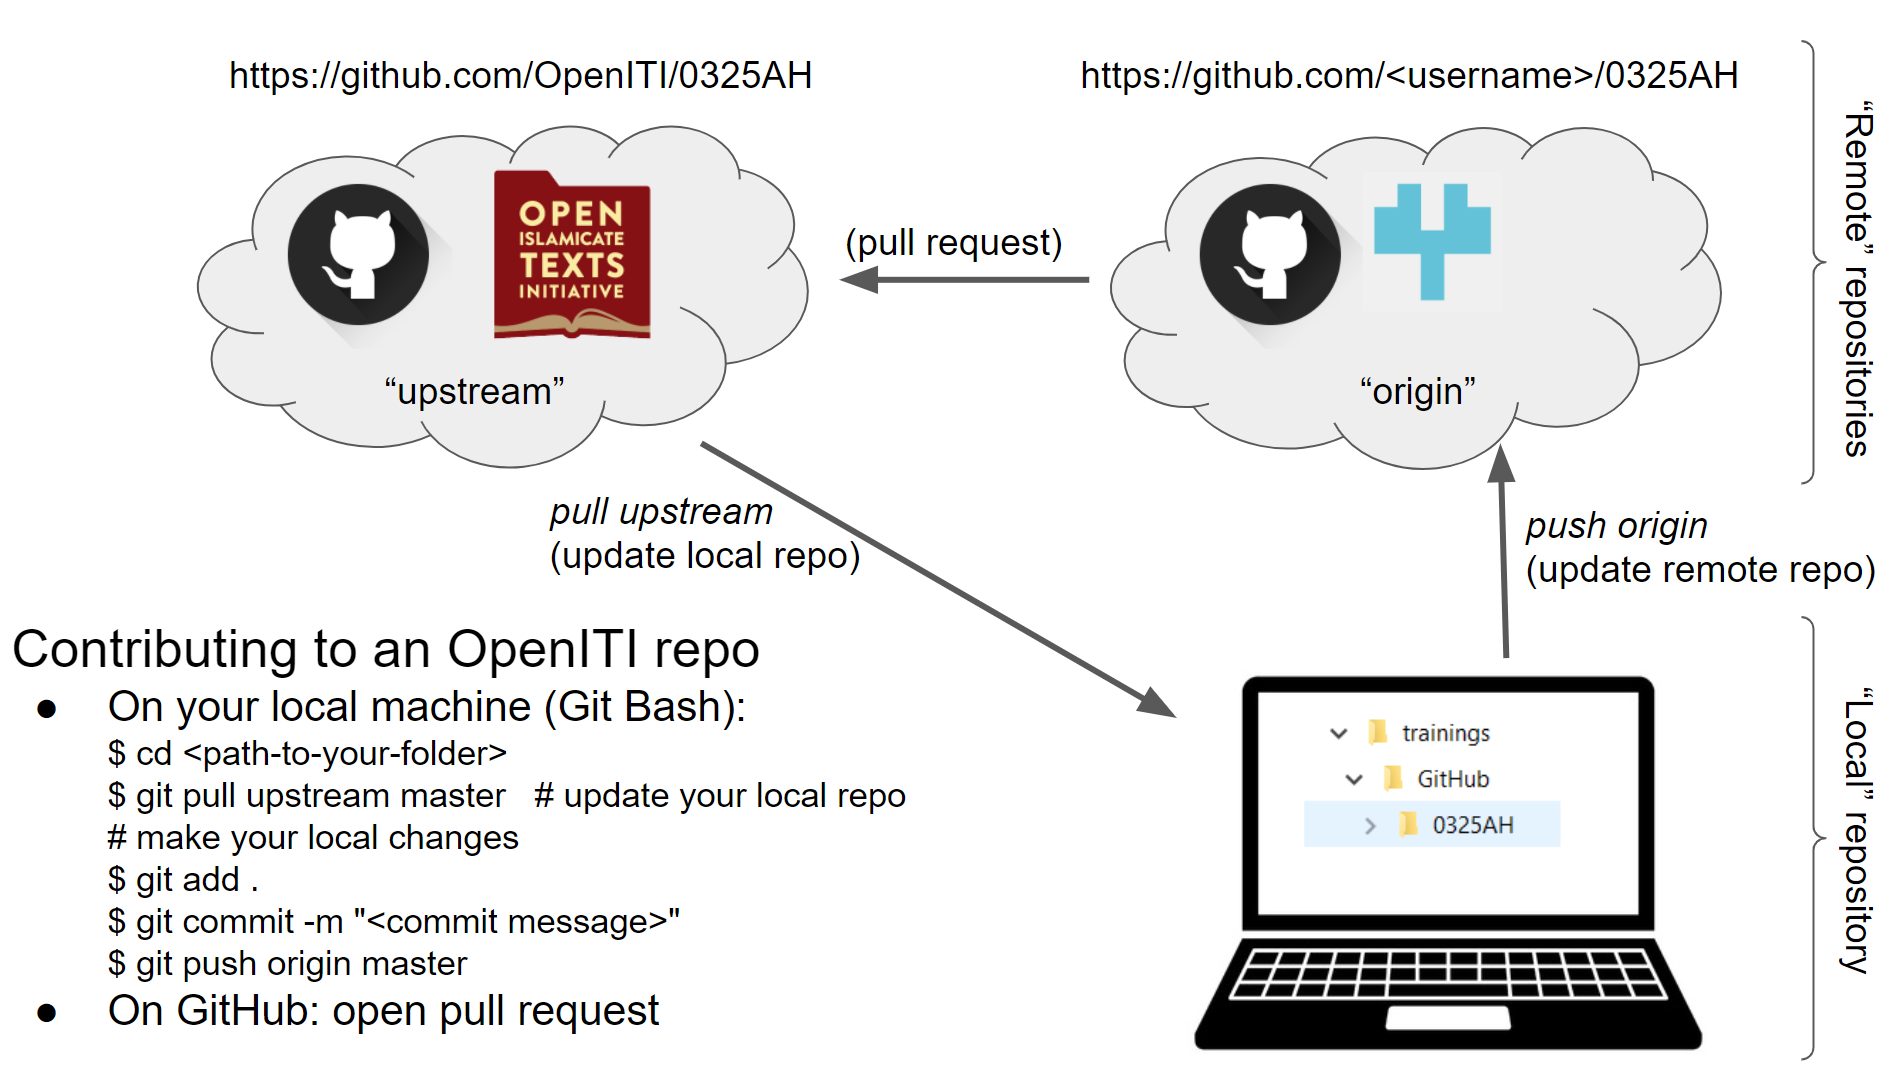
Contribute to OpenITI: push changes and pull requests
Now you have committed your changes in your local Git repo, but if you go to your personal GitHub page, you will see that the changes you made on your computer are not present. Neither are they on the upstream repo, on the OpenITI GitHub page.
In order to update both remote repositories, we will have to “push” our changes to those repositories. This is a two-step process: first, we will push our changes to the remote repo (“origin”) on our personal GitHub page; and then we will request the administrator of the OpenITI GitHub page to pull our changes to the “upstream” repo.
-
In Git Bash on your computer, use the cd command to move into your local repository:
$ cd D:/London/trainings/GitHub/0325AH -
Use the command
git push origin masterto push your changes to your fork on your personal GitHub page:$ git push origin masterNB:
originis the default name for any remote repository you clone on your computer;masteris the name of the branch within that repository. As we explained above, OpenITI does not use different branches in its text repositories, so the name of the branch will always be the defaultmaster. -
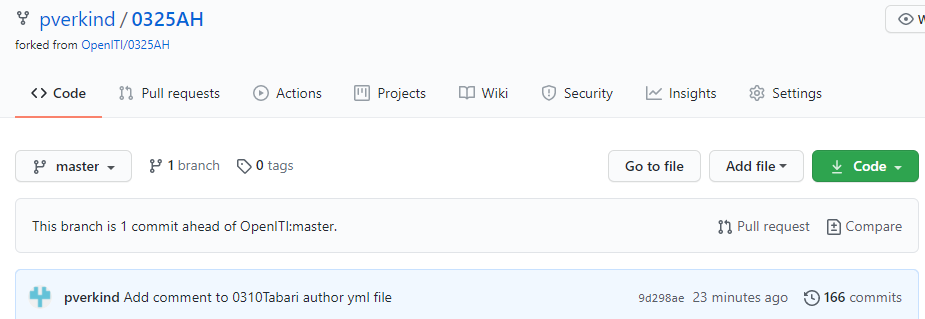
If we go to our personal GitHub page now, we will see that our changes are now also visible in our remote repository. Our commit message is displayed at the top; and GitHub notifies us that our fork is “1 commit ahead” of the repository on the OpenITI GitHub page.
-
We now have to update the
upstreamrepository on the OpenITI GitHub page. Try to use the samegit pushcommand, but now withupstream masteras the names of the destination repository and branch:$ git push upstream masterThis does not work: GitHub does not give us permission to push directly to the upstream repository:
Remote: Permission to OpenITI/0325AH.git denied to pverkind.This is a safety measure by the GitHub website: GitHub allows anyone to fork any public repository; if anyone would be allowed to make changes to any repo, this would open the door to digital vandalism.
-
To update the upstream repository, we have to request the administrator of the upstream repository to accept our changes. This is called a “pull request”. This has to be done from our personal GitHub page. Go to the page of the repo and click
pull requestsat the top of the page: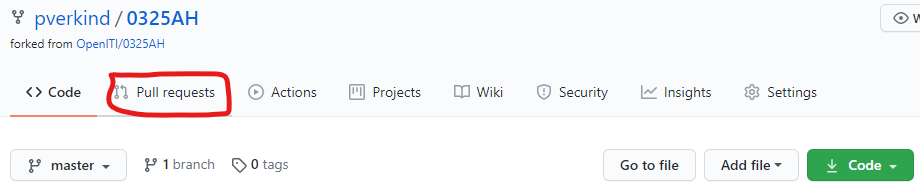
-
In the upper right corner, click the green
New pull requestbutton:
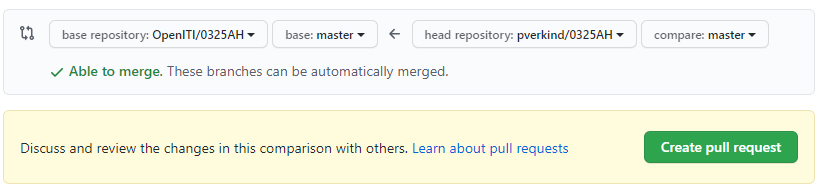
-
GitHub will ask you now between which repositories you want to create the pull request. Make sure the repository on the right of the arrow is the one on your personal GitHub page (<yourUsername>/<repoName>); and the one on the left (the destination) of the arrow is the repository on the OpenITI GitHub page (OpenITI/<repoName>). Then click the green “Create pull request” button.
-
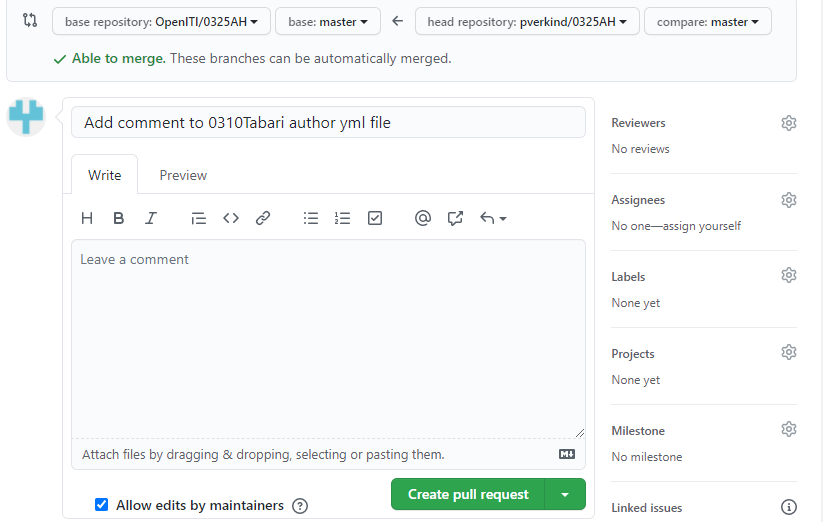
This will open a new window where you should write a “pull request message” (similar to the “commit message” we used on our local machine) to explain your changes to the administrators of the repository. By default, the latest commit message will be filled in as the pull request message. You can add a more verbose comment in the comment field below.
-
Press the green
Create pull requestbutton to finalize your pull request. The administrator of the page will review your changes, and either accept your request, or require you to make alterations before they accept your request.NB: pull requests are not only a safety measure; they are also:
-
a quality control tool: administrators can check whether your changes are acceptable
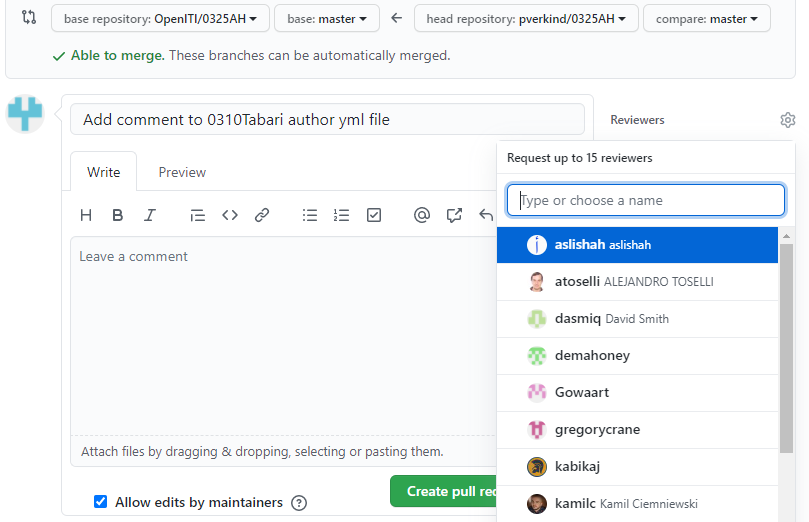
-
A collaboration tool: you can create a pull request to show your changes to administrators and ask their advice. If you feel insecure about your changes, you can ask a specific member of the OpenITI team to review your changes: click “Reviewers” (to the right of the pull request message) and select one or more team members.
Summary

Raising GitHub issues
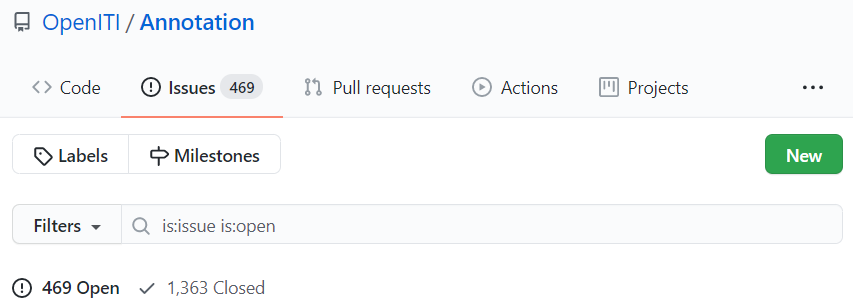
GitHub uses issues to keep track of tasks inside a team, and allow external users to notify the development team about bugs or requests they have. Every GitHub repository has its own issues section, which you can find at the top of a GitHub repo page, just under its title:
OpenITI is an open project and depends on users to flag issues with our texts, as well as with our apps and data. In order to keep things organized, it is important that we keep the issues in the correct location.
- If you notice a problem related to our texts (including the URIs), follow these instructions
- If you encounter a problem with one of our apps, follow these instructions
- If you encounter a problem with the data derived from our texts, follow these instructions
Raising text-related issues
In OpenITI, we collect all issues related to the texts in the corpus in the Annotation repository. This is where we keep track of which texts are being annotated, have quality problems, etc. Each issue related to a specific text (or author) contains its URI in the title.
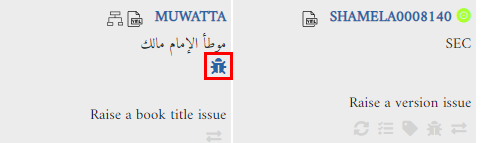
The easiest way to raise text-related issues is through the issue links in our web application:
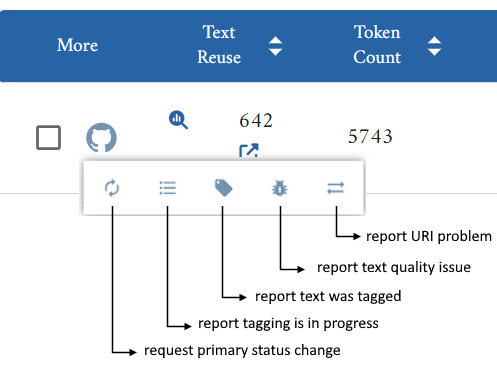
Clicking one of these issue links will bring you to a pre-formatted issue on GitHub that contains the URI of your author / book / version and instructions on how to file the GitHub issue. After filling in the relevant fields, click the “Submit new issue” button to submit your issue.
The metadata app also displays an issue icon if an issue already exists on GitHub related to the author / book / version you’re looking at:
Alternatively, you can raise a new issue directly in the Annotation repository:
-
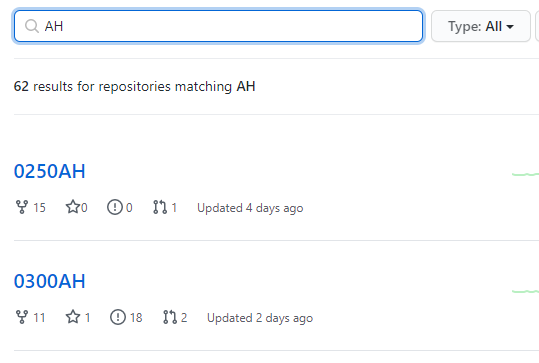
Check whether an issue already exists for your text by typing (or pasting) its URI in the search field in the issues section of the Annotation repository:
-
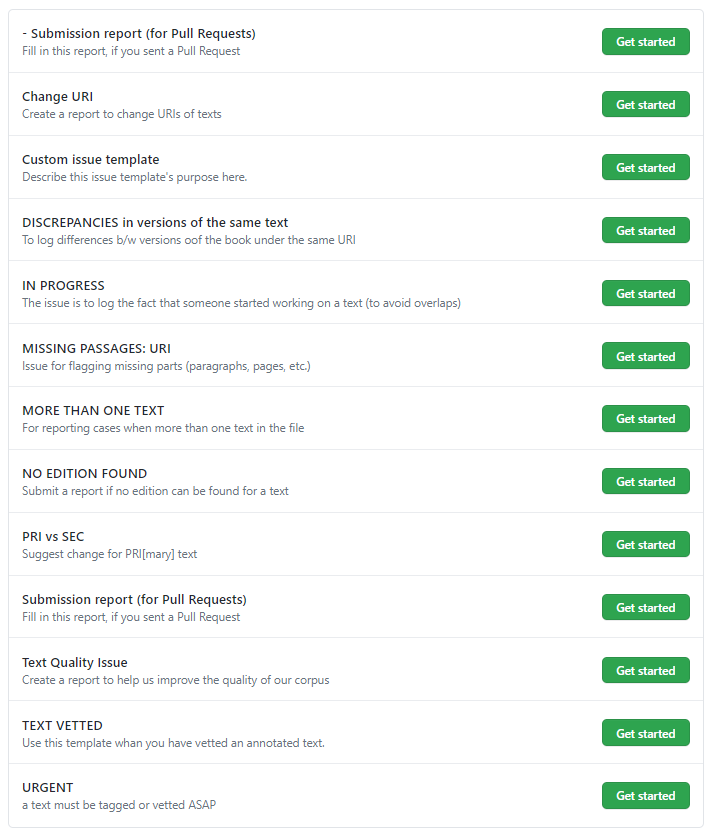
If not, click the green “New” button. This will bring up a page with a number of issue templates for frequently recurring issues. Choose the one that fits your issue best and click its “Get started” button.
-
Each issue template contains directives on how to fill it in. Please follow the directives closely.
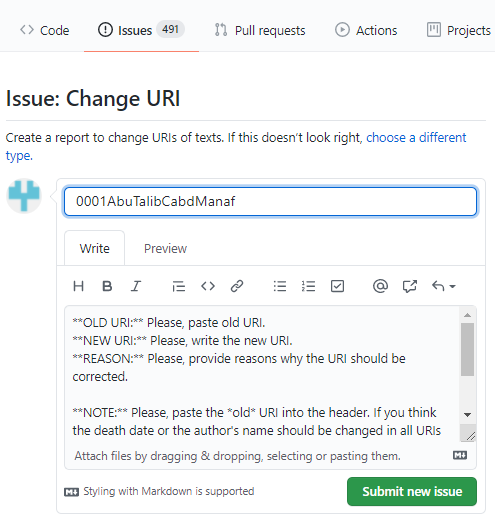
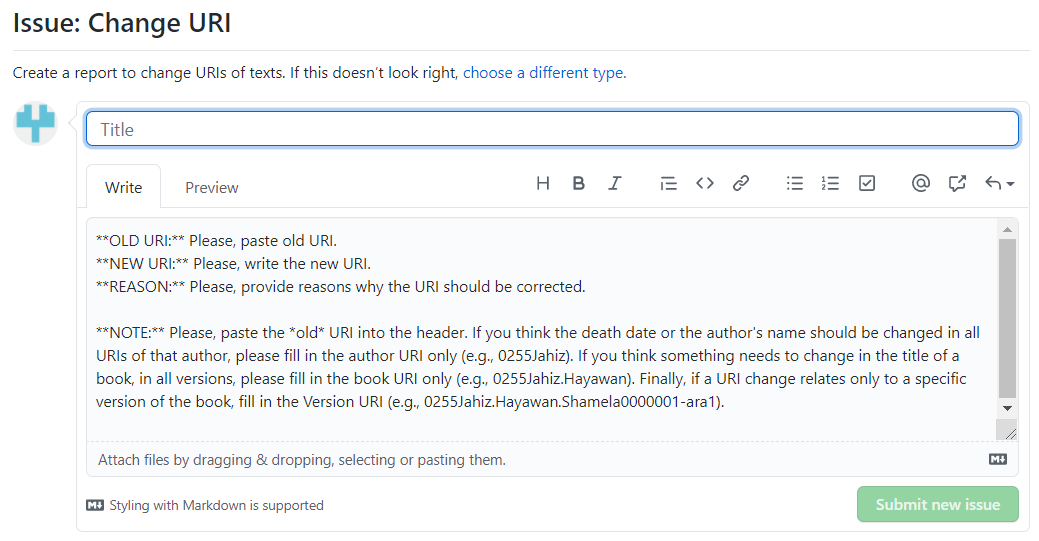
For example, the “Change URI” issue is used for flagging problems with a URI (e.g., a typo in the title of the book, a wrong death date for the author, etc.). The issue template tells you to provide the existing URI, your proposal for a new URI, and a reason. It also tells you to use the old URI as the title of the issue:
-
Do not forget to use the URI in the title of the issue, and then click “Submit new issue”.
-
The OpenITI team will take action to resolve your issue as quickly as possible.
Raising data-related issues
Issues related to data created by the Kitab project (for example, the passim algorithm missed important text reuse cases in your text) should be raised here.
Raising app-related issues
Issues related to apps using OpenITI texts (for example, the app does not load data, a button does not work, the app freezes on a specific action) should be raised in the GitHub repo of that app. Often, there will be a link in the app to the location where you can raise issues with the app.
For apps created by the Kitab project, you can raise issues here.
Contributing New Texts
If you have a text that is not in OpenITI and you want to add it to the corpus, there are a couple of ways to go about this.
The easy way: contact us
The easiest way to contribute a new text is to send it to our corpus manager, Lorenz Nigst.
The barzakh repository
You can also add new texts to the corpus yourself.
New texts are added via a special repository called “barzakh” (an Arabic term that refers to the phase between death and resurrection, similar to the Christian concept of “Purgatory”): https://github.com/OpenITI/barzakh
In order to add your text, you will need a GitHub account (see the tutorial):
-
Fork the barzakh repository (see the tutorial): create a personal copy of the repository on your own GitHub page.
-
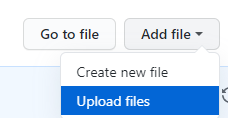
On the GitHub page of your fork of the barzakh repository, go to “Add file”, and choose “Upload files”
-
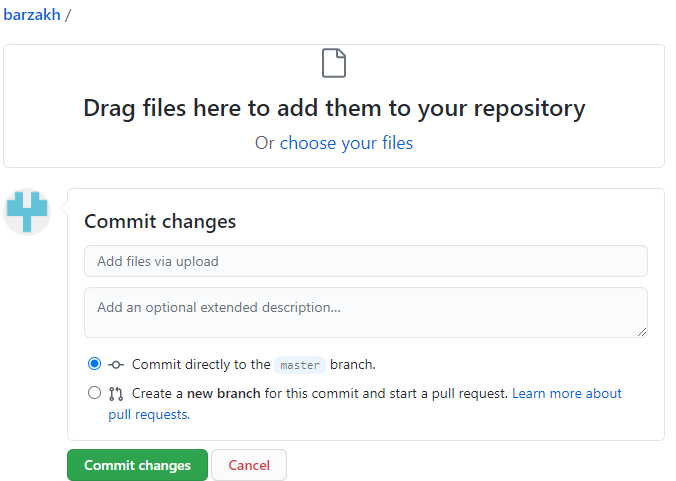
Choose the files you want to add, and write a description of the text file (author, author’s death date, title, original edition (in case of a manuscript transcription: location and call number of the manuscript) in the description box:
-
Click the green “Commit changes” button
-
Create a pull request (see the tutorial)
-
Raise an “Added new text” issue in the barzakh repository to notify the corpus administrators that you have added a text
Our corpus managers will create a URI for your text, make sure it adheres to the basic formatting of OpenITI texts, and create metadata files, before adding it to the corpus.
You can help us by providing metadata about the text and its author, by filling in yml metadata files (templates can be downloaded from here: https://github.com/OpenITI/Templates)
Further reading on GitHub
-
Forking a repo and the Open Source model - good explainer and diagram.
-
Watch a video on Git & GitHub in Dr. Vierthaler’s Hacking the Humanities series: Supplement 1: A quick Git and Github Tutorial.
-
Introduction to Git: very good tutorial for learning the basics of Git.
-
Git from the bottom up: a more technical explanation of how Git works.
4. Annotation guidelines
The annotation workflow is broken into two parts: annotation and validation. Annotators select the text version to annotate, add structural annotation and do a basic update of the YML file. Annotators will also report any faults that they see with a text, flagging them using GitHub issues. Validators check the annotations and the quality of the text.
These steps assume a basic understanding of the GitHub process (see tutorial).
Annotation workflow
-
Annotator forks a repository where the assigned text is.
-
Annotator clones a repository on his/her computer.
-
Annotator uses EditPad Pro for annotating texts.
-
Annotator checks all available text files and chooses a file that is of better quality, easier to annotate and there is an edition to collate with.
-
Annotator submits an issue to the Annotation repository, using the template IN PROGRESS to inform others that a specific text has been claimed and is in the process of tagging.
Note: with this step in place we will always know who is working on what, where, and when. Before you start working on a specific text, simply search for the URI of your text on the page with issues for the Annotation repository: if the URI is not found, it is safe to annotate that text.
-
Annotator finds an edition of the text online (it must be a scanned version of the actual book, not an electronic text file! Alternatively, the actual printed book).
-
If Annotator cannot find a suitable edition:
a. Annotator puts the text aside.
b. Annotator fills the YML as described in YML-1.
c. Annotator submits an issue to the Annotation repository, using template NO EDITION FOUND
-
If Annotator can find a relevant edition:
d. Annotator annotates the text by collating its structure with the PDF or the actual book. Only chapter headers need to be tagged (approximately: what you see in the table of contents).
**IMPORTANT**: save your progress after every tagging session, using **git** (git add . \> git commit -m "your message" \> git push origin master) -
After the annotation is complete:
e. Annotator renames the tagged file by adding the extension
.completedto the end of the filename. For example, if the file was0597IbnJawzi.Muntazam.JK001209-ara1, it should become0597IbnJawzi.Muntazam.JK001209-ara1.completedf. Annotator updates the relevant YML file, as described here.
g. Annotator commits the changes in her local git repo and pushes those local updates to her remote repository
h. Annotator submits a pull request (please, make a pull request for each finished text!)
i. Annotator submits an issue to the Annotation repository using the template Submission report (for Pull Requests):
-
The title of the issue (already prefilled) should be: TEXT TAGGED: <URI of the text>
-
In the body of the issue: please paste the contents of your version YML file (from YML-1).
j. Annotator closes the
IN PROGRESSissue for that text (opened in Step 4a, above). -
-
Repeat
Validation workflow
-
Validator downloads annotated text from GitHub
-
Validator checks issue reports on GitHub and yml file for text issues that need to be assessed and fixed.
-
Validator begins work with text:
a. Validator fixes any text issues that can be addressed.
b. Validator checks the annotation against the printed edition
c. IMPORTANT: save your progress after every tagging session, using git (git add . > git commit -m “your message” > git push origin master)
-
Validator saves text with extension .mARkdown
-
Validator checks and updates all relevant yml files and saves them.
-
Validator commits changes and pushes back to GitHub
-
Validator closes issue
OpenITI mARkdown
The texts in the corpus are in OpenITI mARkdown format, a simple system for tagging structural, morphological and semantic elements. The system was designed to enable annotators to add basic tagging to texts in Arabic script (and other right-to-left languages) more quickly and without the text direction issues that plague annotators of RTL texts with other markup schemes.
A full description of OpenITI mARkdown can be found here: https://alraqmiyyat.github.io/mARkdown/
***To be added
- Basic regex guide for annotators***
Further reading
-
Annotation Workflow - Version 20/12/2019 - covers both 3 and 4 - also explains YMLs
-
A useful annotator’s introduction is found in the following blog:
5. Software (versions and installation)
OpenITI is designed not to depend on specific software. However, a number of software packages are especially useful for interacting with the corpus.
OpenITI text files are plain text files, and they can be read and edited using any text editing program. However, some text editors do not handle text in right-to-left languages like Arabic and Persian well; and others have problems displaying large files.
Our text editor of choice is currently Kate editor, a free text editor that works on all major platforms (Mac, Windows, Linux), supports right-to-left languages, can handle rather large texts and allows search in entire directories. Moreover, it offers custom highlighting schemes that allow highlighting of OpenITI mARkdown tags. Kate does struggle sometimes with the very largest texts in the corpus.
On Windows, a good alternative to Kate is EditPad Pro, which handles very large texts better than Kate.
For instructions on installing Kate and EditPad Pro, see below.
Kate editor
Kate editor is currently the best alternative to EditPad Pro on Mac, but it works on Windows and Linux as well.
Installation on Windows
-
Download the most recent installation file here:
https://cdn.kde.org/ci-builds/utilities/kate/master/windows/ ; download the exe file to install. -
Once the file was downloaded, double-click the installation file and follow the instructions (you can keep all the default settings the installer proposes)
-
Kate should now be installed on your computer. Proceed to install the OpenITImARkdown highlighting scheme (see below)
Installation on Mac
- Download the
.dmgfile here:- if your Mac has an ARM chipset: https://cdn.kde.org/ci-builds/utilities/kate/master/macos-arm64/
- if your Mac has an x86 chipset: https://cdn.kde.org/ci-builds/utilities/kate/master/macos-x86_64/
((If you don’t know if your Mac has ARM or x86 chips: see here: https://www.quora.com/Is-my-Mac-ARM-or-x64)
-
Once downloaded, click on the .dmg file, and drag the Kate icon to the Applications folder.
NB: When you now click the Kate icon in the applications folder, you will most likely get a message like
  “kate” can’t be opened because Apple cannot check it for malicious software.
  This software needs to be updated. Contact the developer for more information.
This is because recent Mac instances do not allow you to install apps from non-verified developers. There is however a way to override this security measure:
- Go to “System Settings” => “privacy & security” => scroll down, under “Security” you will see a note saying
"Kate" was blocked from use because it is not from an identified developer - click “open anyway”
- a new pop up will appear where you will have to consent again, and then the app should launch
The process is generally explained here (+ a shortcut if you’re feeling adventurous): https://mac-how-to.gadgethacks.com/how-to/open-third-party-apps-from-unidentified-developers-macos-0158095/
- Go to “System Settings” => “privacy & security” => scroll down, under “Security” you will see a note saying
- Kate should now be installed on your computer. Proceed to install the OpenITImARkdown highlighting scheme (see below).
Installing the OpenITI mARkdown highlighting scheme for Kate
On Windows:
- Download the zip file https://github.com/OpenITI/mARkdown_highlighting_Kate/archive/refs/heads/main.zip
- Unzip the zip file
- Open the unzipped folder in Explorer, and double-click
install_on_windows.bat. This will install the OpenITImARkdown.xml file in the folder%LocalAppData%/org.kde.syntax-highlighting/syntax - Close Kate and (re-)open it. The OpenITImARkdown highlighting scheme should now be visible in Kate’s menu: Tools > Highlighting > Markup
And also in the dropdown menu in the bottom right of your Kate screen:
On Mac:
- Download the zip file
- Unzip the zip file
- Open the unzipped folder in Finder
-
Choose View > Show Path Bar
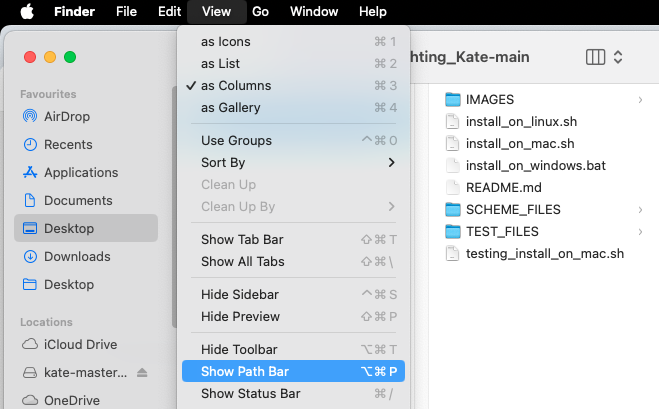
-
Finder should now display the path to the current folder (mARkdown_highlighting_Kate) at the bottom of the window. Control-click the folder in the path bar, then choose “Open in Terminal”:
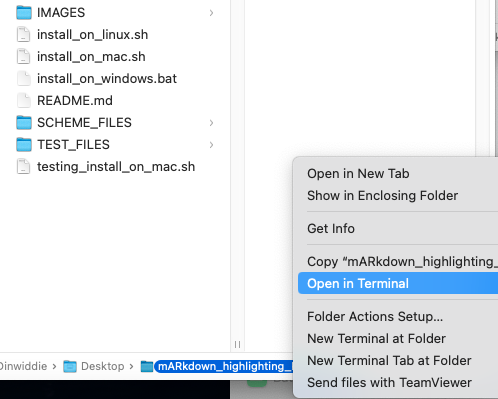
- The Terminal window opens. In it, write the following command:
bash ./install_on_mac.sh. This will then install the OpenITImARkdown.xml file in the folder$HOME/Library/Application Support/org.kde.syntax-highlighting/syntax - Close Kate and (re-)open it. The OpenITImARkdown highlighting scheme should now be visible in Kate’s menu: Tools > Highlighting > Markup
And also in the dropdown menu in the bottom right of your Kate screen:
On Linux:
- Download the zip file https://github.com/OpenITI/mARkdown_highlighting_Kate/archive/refs/heads/main.zip
- Unzip the zip file
- Open the unzipped folder in your file manager, and double-click
install_on_linux.sh. This will install the OpenITImARkdown.xml file in the folder$HOME/.local/share/org.kde.syntax-highlighting/syntax/ - Close Kate and (re-)open it. The OpenITImARkdown highlighting scheme should now be visible in Kate’s menu: Tools > Highlighting > Markup
Working with Kate
Forcing an entire text file to be displayed from right to left:
By default, Kate automatically determines the reading direction of each line of text separately; the first character with a specific direction (right-to-left or left-to-right) determines the direction of the line.
To force Kate to display all lines in a text file from right to left, go to the View menu and choose “Force RTL direction”.
Activating the OpenITI mARkdown highlighting scheme
If you have correctly installed
the highlighting scheme, texts that have the extensions .mARkdown, .completed
or .inProgress should automatically activate the highlighting scheme.
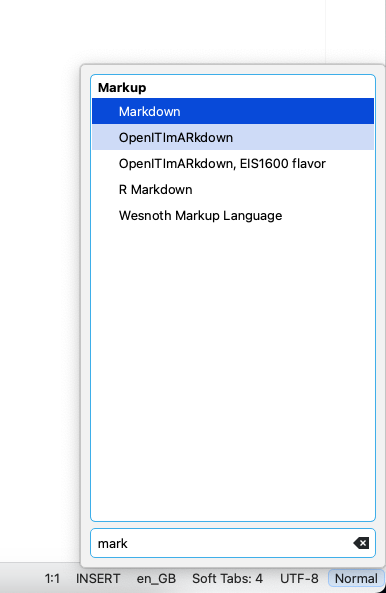
You can see the active highlighting scheme in the dropdown box at the bottom right of the screen:
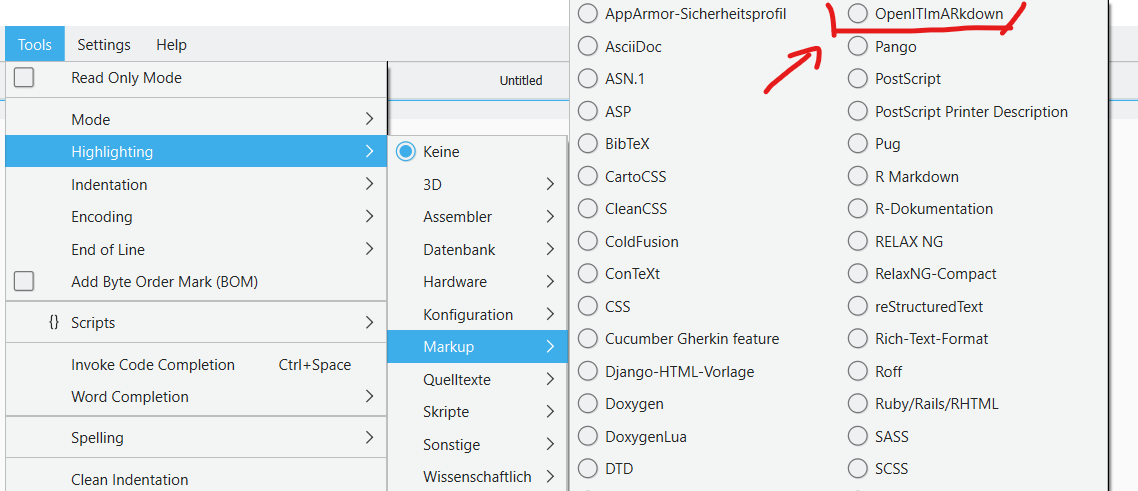
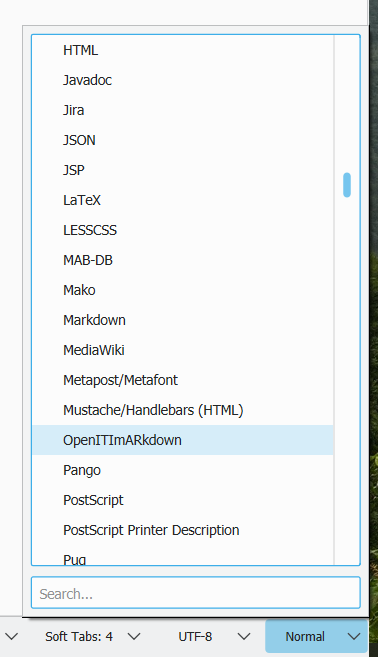
If this does not say OpenITImARkdown, click the button, write OpenITI and
select the OpenITImARkdown.
NB: there is also a markdown highlighting scheme in the list; this is designed
for the markdown language on which OpenITI mARkdown is loosely based,
but will not highlight OpenITI mARkdown text correctly.
Alternatively, you can select the OpenITImARkdown highlighting scheme in the
list in the Tools > Highlighting > Markup menu:
Setting OpenITI mARkdown as the default highlighting scheme
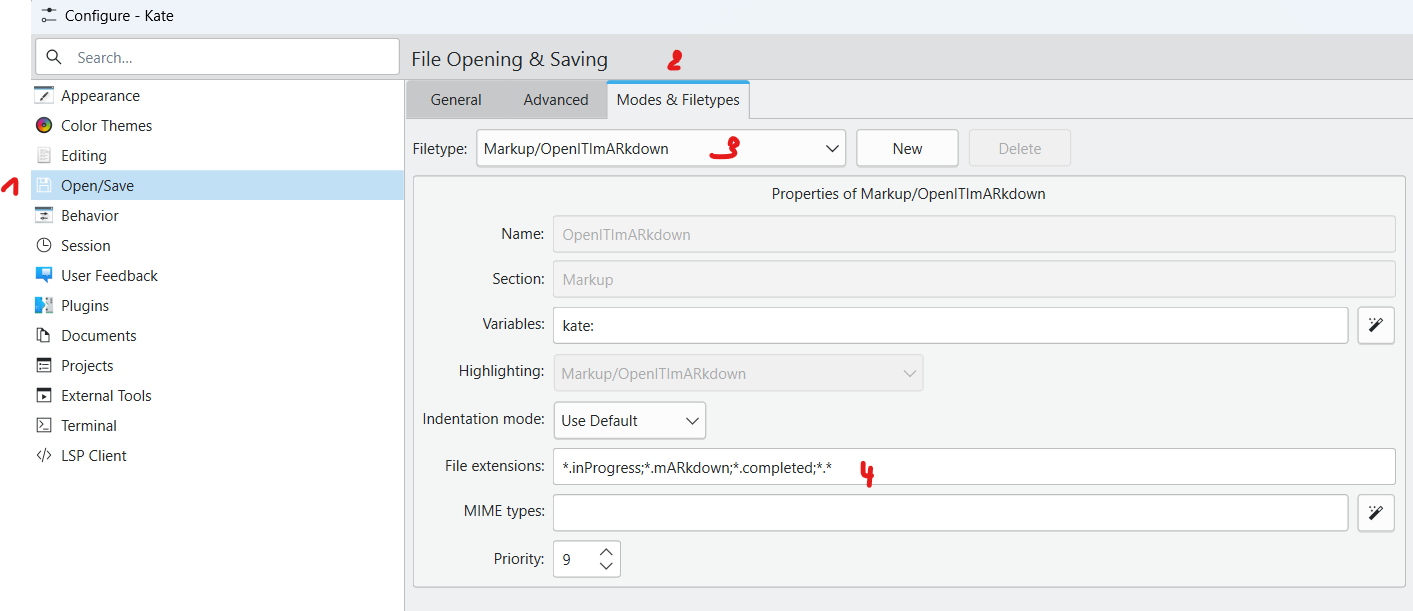
Go to the Settings menu and select “Configure Kate…”
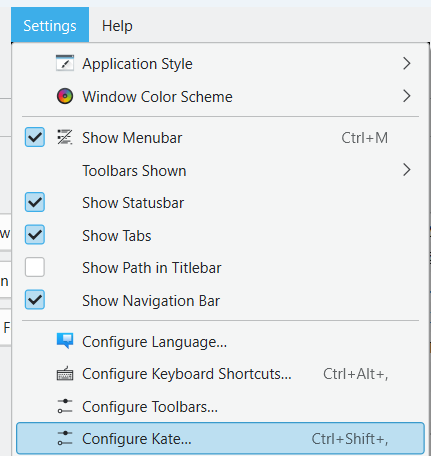
Then choose Open/Save > Modes & Filetypes > Filetype: Markup/OpenITI mARkdown > File extensions: add *.*
Folding sections
One of the most useful features of Kate and OpenITI mARkdown is that it allows you to fold all sections, displaying only their headers - a kind of table of contents.
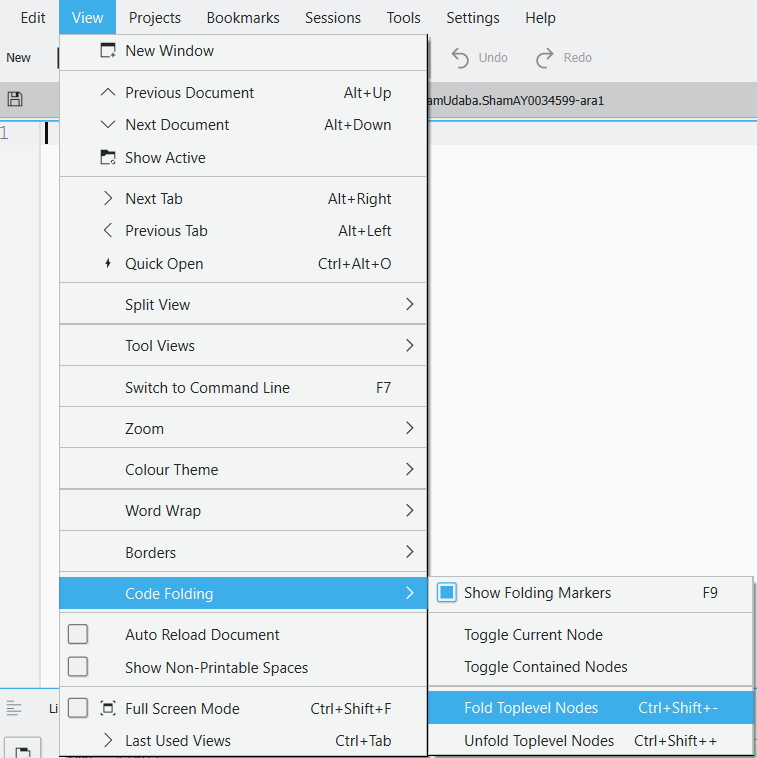
In the menu, go to View > Code Folding > Fold Toplevel Nodes to collapse all
sections, and View > Code Folding > Unfold Toplevel Nodes to make them visible
in their entirety again.
You can also use the following key combinations:
CtrlShift-for foldingCtrlShift+for unfolding
NB: In a large text, it may take a second or two for the folding to take effect.
You can also use the triangles next to the line numbers in the text to fold/unfold a single section:
Search and replace
Kate contains three options for searching and replacing:
- the
Searchbar: simple search in the current document - the
Power Search and Replacebar: regex search and replace in the current document - the
Search in Filesbar: regex search and replace in multiple documents at the same time
The latter option is the most powerful, and displays all matched lines.
Search bar
To make the Search and replace bar visible, go to Edit > Find:
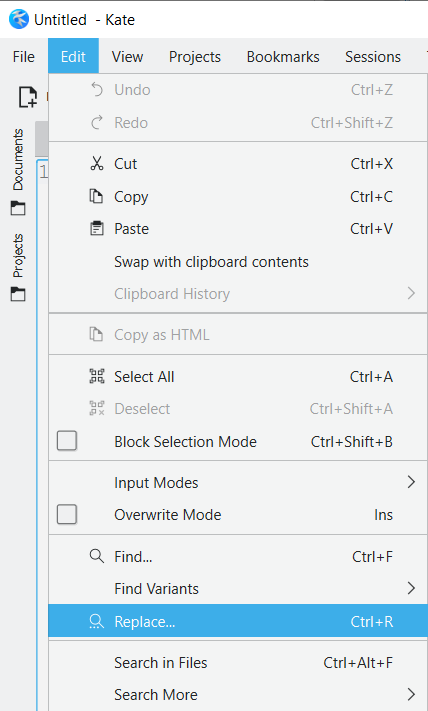
You can also use the Ctrl+F key shortcut.
This opens up a basic search bar, in which you cannot use regular expressions:

-
The
Aabutton toggles case sensitivity on and off. -
You can close the search bar by clicking the button with
xin a red circle at the left-hand side of the search bar.
To use regular expressions, open the Power Search and Replace Bar
by clicking the button with the sliders on the right of the search bar: 
The Power Search and Replace bar
To make the Search and replace bar visible, go to Edit > Replace:
You can also use the Ctrl+R key shortcut.
This opens the Power search and replace bar at the bottom of the screen:

Selected controls:
-
With the
Modedropdown, you can select whether you want to use Regular Expressions or plain text search. -
The
Aabutton toggles case sensitivity on and off. -
You can close the
Power Search and Replacebar by clicking the button withxin a red circle at the left-hand side of the search bar. -
Use the
Replacebutton to replace only the current match; useReplace Allto replace all matches in the document. -
If you hit the
Find allbutton, the number of matches found in the document will be displayed.
The Search in Files bar
This is Kate’s most powerful search and replace option.
Open the Search in Files bar in one of three ways:
- in the menu, choose
Edit > Search Files - use the shortcut key combination
Ctrl+Alt+F - click the
Search and Replacebutton in the bottom left of the screen:

The Search in Files bar contains much more options than the other search bars:
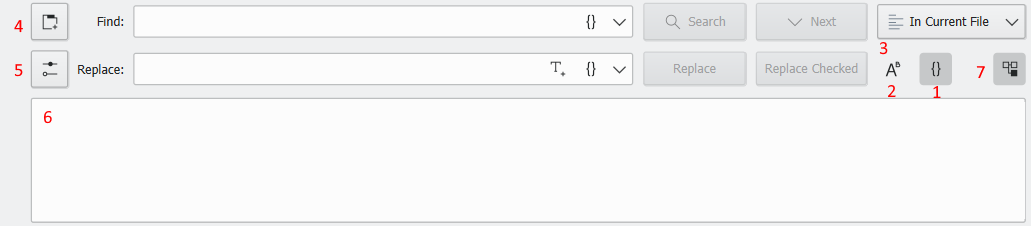
{}button: toggle regular expressions on/offAabutton: toggle case sensitivity on/off (default: case insensitive, “abc” will match “abc”, “ABC”, “aBc”, etc.)- You can define whether the search and replace operation is executed only in the current file, in all open files, in a folder, in a project, or in all open projects.
- you can run multiple searches at the same time: open a new search tab with this button
- use this button to show all search options.
- When you conduct a search, the results will be displayed in the results pane:
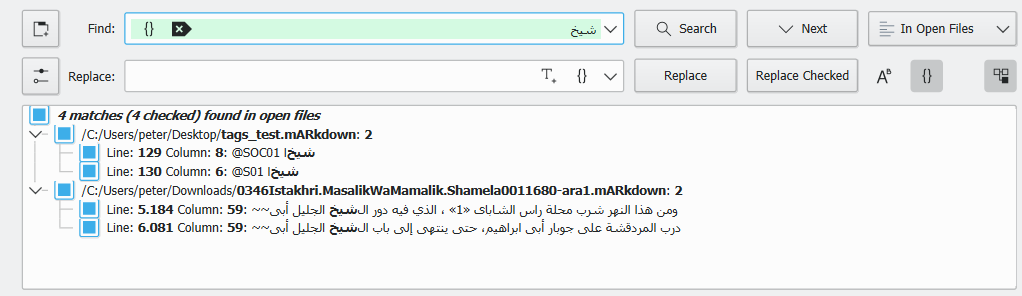
- You can expand and collapse the search results in each file using this button:
You can check and uncheck results in the results pane; use the button Replace
Checked to replace all checked results in the results pane.
NB: for regex capture groups, Kate uses the \1, \2, etc. syntax (as in Python),
not the $1, $2, etc. syntax (as in Perl and JavaScript):
Displaying the toolbar
A tool bar can be displayed below Kate’s menu bar.
Go to Settings > Show Toolbar to display it.
You can add buttons to the toolbar in the Settings > Configure Toolbars.
Change font and other settings
Go to Settings > Configure Kate to change the font, font size and other settings:
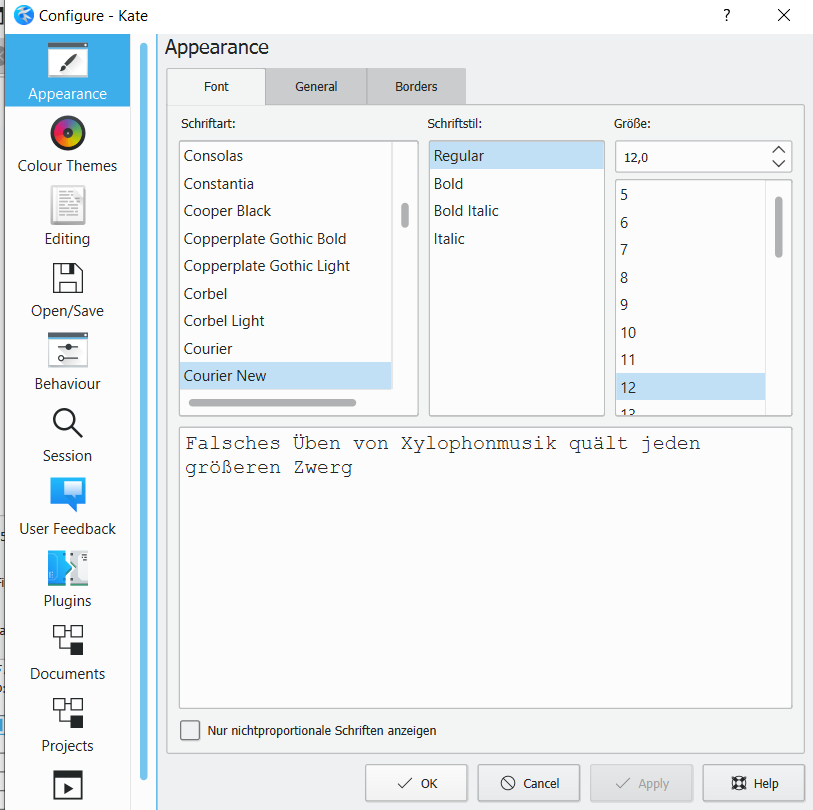
EditPad Pro
EditPad Pro is a powerful text editor with good support for right-to-left text and large files.
The free (trial) version of the software can be downloaded here: download.jgsoft.com/editpad/SetupEditPadProDemo.exe . The trial version is fully functional for the needs of working with OpenITI texts.
NB: EditPad Pro works on Windows only. If you use a Mac or Linux computer, you can still run the program using an emulator software like Wine (winehq.org/), which makes it possible to use Windows programs on Mac and Linux. For Mac, see: wiki.winehq.org/MacOS. Alternatively, you can install a virtual machine on your computer that runs Windows:
-
Parallels (commercial): parallels.com/products/desktop/
-
VirtualBox (free): virtualbox.org/
Once you have downloaded and installed EditPad Pro, take the following steps to install the OpenITI mARkdown highlighting schema (see github.com/OpenITI/mARkdown_scheme for more detail):
-
VERY IMPORTANT: Make sure that EditPad Pro is fully closed. Do not close it using the “X” in the upper right corner (which will not fully close the program) but go to ‘file > exit’ in Edit Pad Pro.
-
Download https://github.com/OpenITI/mARkdown_scheme/archive/master.zip
-
Unzip the downloaded file.
-
The unzipped folder contains two zip files; one for EditPad Pro Version 7 and one for EditPad Pro version 8. Unzip the file for your version of EditPad Pro.
-
Open the unzipped folder, and copy all of the files
-
Within the unzipped folder, double click on the link
__Follow_this_link_to_paste_mARkdownScheme7.lnk. This link takes you to the location where EditPad Pro was installed on your computer (%APPDATA%/JGsoft/EditPad Pro 7in case of EditPadPro7 and%APPDATA%/JGsoft/EditPad Pro 8in case of EditPadPro 8) -
Paste the files into this folder
-
Now, open EditPadPro. If you have done everything correctly, the background in EditPadPro should be of yellowish color. If the background is still white, you need to repeat the whole procedure; now, make absolutely sure to shut down EditPadPro (not just click on the x in the top right corner, but shut it down through FILE > Exit), then repeat all steps from the beginning of this section.
-
The scheme is automatically activated in EditPad Pro by the first line in the file, which must be:
#####OpenITI#(called “magic value” in EditPad Pro) -
Open a file in EditPad Pro and check if the schema works. It should look like this:

NB: EditPad Pro was upgraded from version 7 to version 8 in 2020. Currently we provide highlighting schemas for both versions, but 7 will be phased out in future updates.
Git Bash
Installing bash/working through command line tool: see tutorial
6. Teaching and learning resources
(Coming soon…)
FAQ
How can I find a text in OpenITI?
The easiest way to find a text in the OpenITI corpus is to use the metadata application at kitab-project.org/metadata. The search function of the app allows you to filter the books by the author’s name or year of death, the work’s title, a specific OpenITI version id, and/or tags. To download a single text file, right-click the Version Id of the book (in the right-most column) and choose “save as”. By clicking on that Version Id you can access the text on GitHub; clicking on the Book Title link will bring you to the folder on GitHub where all text versions and metadata of the same book are stored, and clicking on the Author link will open the GitHub folder where all works by that author are stored.
Search works either in Latin script with transliterated forms or in Arabic. For searches in Arabic, please note that, for example, to write or not to write hamza on alif matters (see the different numbers of results for الأمان/الامان). At present, the Arabic metadata is not entirely consistent in that respect. For search with transliterated forms, please follow the following rules:
-
The Library of Congress scheme is followed in its simplified version, omitting all diacritics so that only ASCII characters are used. Two most problematic Arabic letters are dealt with in the following manner: 1) hamzas are omitted to avoid using non-letter characters; 2) ʿayns are transliterated with c, which is capitalized when appropriate (ʿAlī > Cali; Aʿyān al-šīʿa > AcyanShica).
-
b. (ابن) as part of a name is written in full and capitalized: ʿAlī b. Abī Ṭālib > CaliIbnAbiTalib.
-
Although an effort was made to use šuhras for AuthorIDs, in cases when it was not possible, the following formula was followed: Ibn + Ism Abī-hi + Nisba (these were the onomastic elements most commonly available in the metadata).
-
The word kitāb is dropped from the titles, unless it is the major keyword, like in the case of, for example, Sībawayhī’s Kitāb, whose unique identifier is 0180Sibawayh.KitabSibawayh.
-
Definite articles are dropped everywhere: Tārīḫ al-islām > TarikhIslam.
-
Parts of the same entities are written together, in camelcase. In other words, there are no spaces between words, but each word is capitalized: al-Nāsiḫ wa-l-Mansūḫ > NasikhWaMansukh.
-
NB: In the beginning, tāʾ marbūṭas were dropped throughout, but later transliterated only in iḍāfas; still fixing that issue…
Here is an example that shows how search function works.
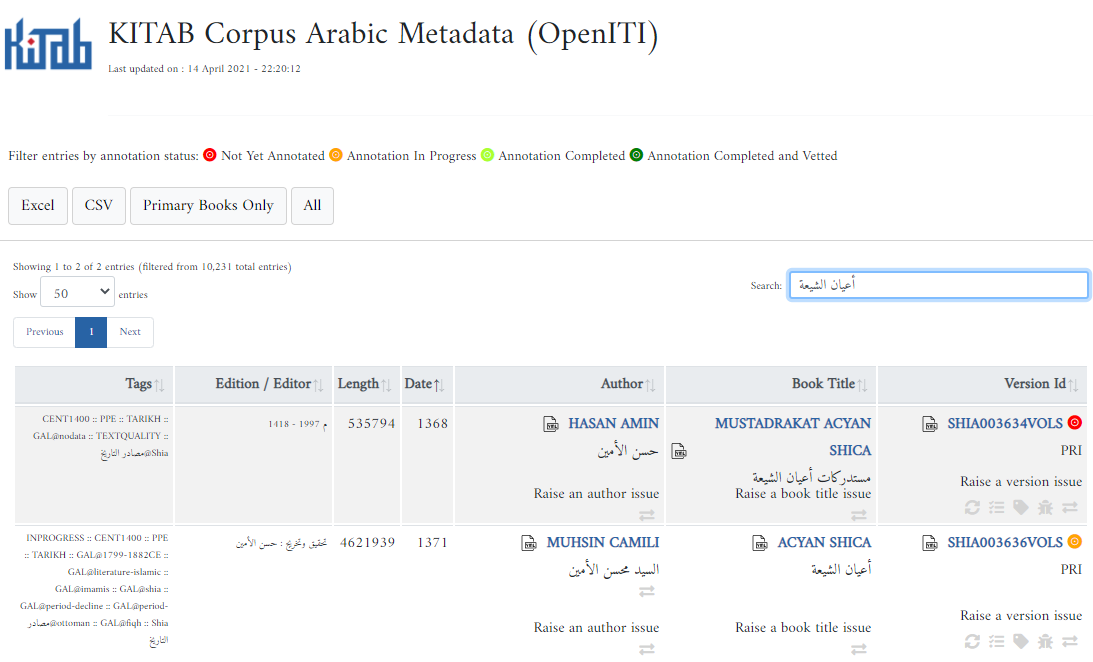
Further reading:
The text I’m looking for is not in OpenITI. What now?
- Check if you can find the text here:
- https://kitab-collections-app.azurewebsites.net/ Many texts have not yet been added to the OpenITI corpus. However, we already do have them in machine-actionable form.
-
Add a text yourself: see how
- Request a new text be added: see how
How do I add a text to the OpenITI corpus?
See the tutorial here
To do:
-
How to share a link to a text
-
We welcome your transcriptions - blog instructing how to transcribe for us (setting ground rules and benefits) (?)
-
Agree on initials of contributing individual to be used in the URI
- Make sure the initials are documented here:
-
For manuscripts - point to explainer on mARkdownMSS?
-
-
Directions to the OCR pipeline (?)
How do I request a new text be added?
If you have an open access version of a text in machine-readable format or a PDF (if the digital version is not available), or a link to such versions please create a “New text request” issue in the barzakh repository. Please make sure that you fill in all the necessary information to speed up the process. PDF versions will be sent to the OCR process.
If you have a transcription, the quickest way is to push to the barzakh repository. The texts in this repository will be processed and added to the corpus. For more information, please see Contributing New Texts.
For other cases, please contact us.
How do I cite OpenITI texts?
OpenITI releases are published under the CC BY-NC-SA 4.0 license. Our files are based firstly on existing open digital libraries, which we acknowledge in our URIs. Please, do cite URIs of specific files if you use them in your research. To cite the entire corpus, please check the release version which you would like to cite and use the citation information from our GitHub repository (https://github.com/OpenITI/RELEASE). OpenITI releases are freely available to download, in their entirety at the above link and Zenodo.
What is the quality of the texts in OpenITI?
Our digital texts are generally speaking reliable reproductions of modern printed editions. We are finding this as we annotate digital files of books and compare them to their printed counterparts. However, our texts come from different sources, and their quality varies. The best quality texts were probably double-keyed, but many texts (e.g., those digitized by al-Maktaba al-Shamela, see this publication, p. 15) were typed up by a single typist and proofread by another. The worst quality texts are those produced by Optical Character Recognition (OCR) software, which currently still has an accuracy rate below 95 % for Arabic. OpenITI is a partner in a Mellon Foundation-funded project to improve the quality of Arabic-language OCR.
We do not have the manpower to proofread all texts in the corpus. We rely on you, the user of OpenITI, to flag typos and other problems in our texts. Please raise a text quality issue if you encounter typos or other text quality problems. Or correct the text yourself and create a pull request.
Different types of digital analysis of texts require different levels of accuracy of texts in the corpus. For example, a search will likely fail to find a word with a typo in it; but the passim algorithm used by the KITAB project to detect text reuse, was developed for badly OCR’ed texts and is not thrown off by such small text quality problems.
Further reading:
-
KITAB project blogs about quality issues with OpenITI texts:
Do you use texts generated by Optical Character Recognition?
Some of the texts in the corpus we collected from other digital text repositories seem to have been created using OCR software, but this is rarely mentioned in the metadata. OCR software currently still has an accuracy rate below 95 % (and often even much lower) for Arabic. OpenITI is a partner in a Mellon Foundation-funded project to improve the quality of Arabic-language OCR. We are slowly adding new texts to the corpus using OCR; if a text was OCR’ed by OpenITI contributors, this will be mentioned in its metadata file.
Even if the quality of OCR’ed texts is not always good enough for close reading,
or to conduct reliable searches using regular expressions,
the quality may still be good enough for other distant reading approaches
(for example, the passim text reuse algorithm).
How can I help develop OpenITI?
- produce good scans for the OCR pipeline
- annotate texts relevant to research interests that do not have annotation
- update metadata for texts
- draw attention to projects
I found a typo in a text / a mistake in the metadata or URI. How do I flag this?
-
Please raise an issue on GitHub (you will need a GitHub account to do this):
Give your issue a title and fill in the form. Click the “Submit new issue” button.
-
Alternatively, you can use the metadata application to create a selected categories of github issues on the existing texts in OpenITI. The issues will be assigned a proper label and the OpenITI development team will take care of the issue.
-
To generate an issue, first find the text in the metadata application (see how).
-
The author, Book Title and Book Id columns contain a number of icons that can be used to raise issues:
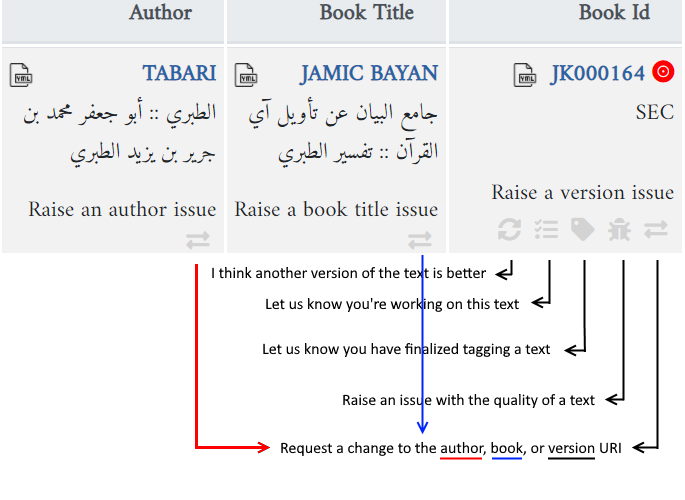
Use one of the issue links to click in the Book id column of the text. These categories are in fact the labels that we have created for the issues on the OpenITI Annotation repository. Make sure that you have a github account to raise an issue. If you have one and are already logged in the github, you will be redirected to a page where you can create an issue by filling the required information and clicking the “Submit new issue” button (see the example below). You can also choose another category for the issue here and click the “Get started” of the proper category.
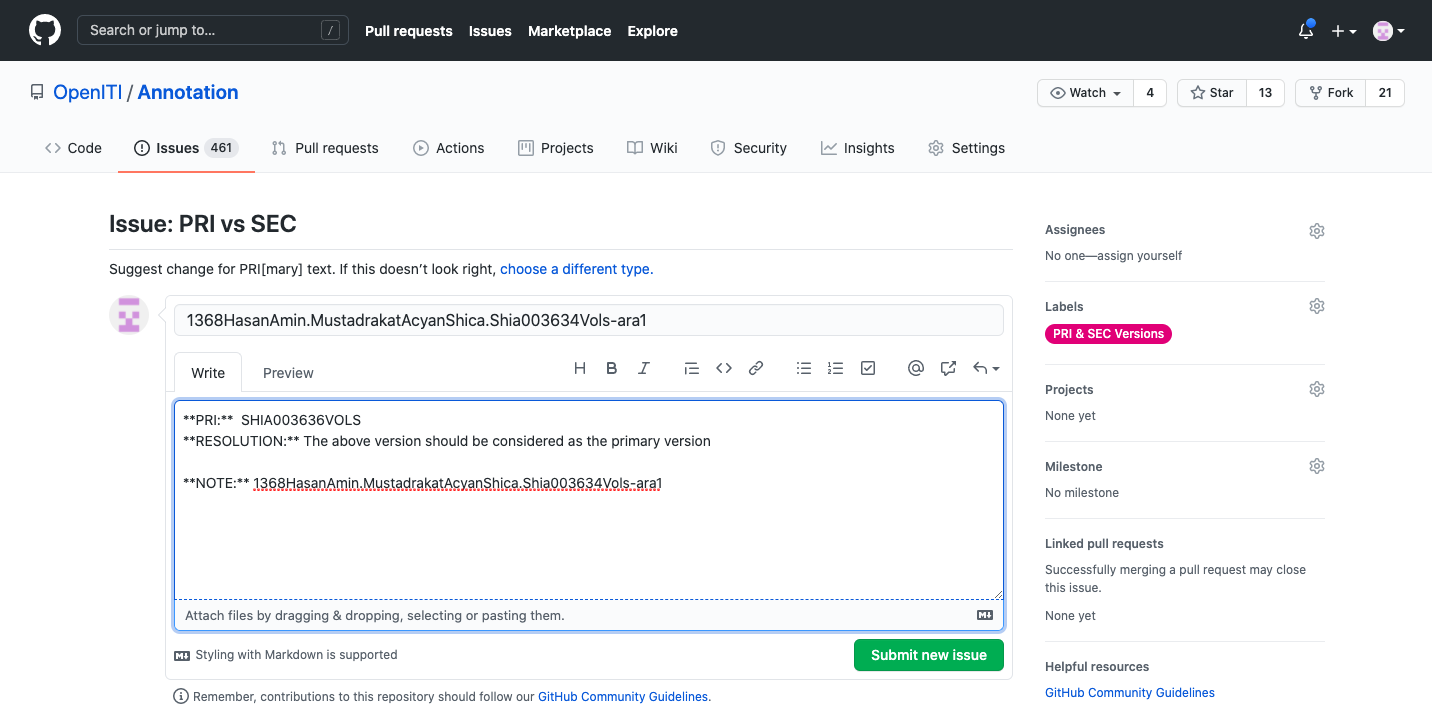
-
You can also submit issues directly on the corresponding github repository by clicking on the "New issue" on the "Issues" tab in the Annotation repository (see the example below). This way provides more categories of issues in case you cannot find the proper one on the metadata app.
How can I use OpenITI? What license is used?
OpenITI is published under the CC BY-NC-SA 4.0 license. You can use the corpus and publish or share your works based on it according to the license. Please, do cite the files or the corpus if you use them. For the citation information, please use this link.
what about copyright issues?
OpenITI has a duty to ensure all content of uploaded texts is not subject to copyright. In order to comply with this, all editions which are still in copyright must have their copyrighted content removed (that is all editorial input, such as footnotes and introductory matter). OpenITI removes this type of content in the course of its text annotation process.
Why do you use mARkdown rather than TEI? Can I convert my TEI tags to mARkdown or vice versa?
OpenITI mARkdown was designed by Maxim Romanov to enable annotators to add basic markup to Arabic texts more quickly than with more complex schemes like TEI XML and without the conflicts between right-to-left text and left-to-right tags that plague annotators of Arabic texts in other markup languages. OpenITI mARkdown tags can be automatically converted into TEI XML.
A text I am researching is in the corpus but not annotated, or the annotation is insufficient for my research interests. What do I do?
-
Improve the annotation yourself: follow the annotation guidelines
-
If you’re interested get in touch - please email us at kitab@aku.edu and we will try and get back as soon as possible.
-
If you have a question about the corpus, mARkdown annotation or our methods, please consult our FAQs before sending us an email.
I am not sure there is an appropriate mARkdown annotation, or I am not sure how to annotate a particular part of a text. What do I do?
- Check the full description of OpenITI mARkdown at alraqmiyyat.github.io/mARkdown/
- If you can’t find what you need, contact us at kitab@aku.edu
Glossary
-
OpenITI: a GitHub organization where all texts are hosted (https://github.com/OpenITI).
- OpenITI mARkdown: an easy-to-use tagging scheme developed for
texts in OpenITI. Detailed description can be found here:
- https://maximromanov.github.io/mARkdown/. If you have any questions, concerns, or suggestions, you can leave a comment at the bottom of the page.
- Annotation repository: a repository in the OpenITI, where all metadata on the entire corpus is being aggregated:
-
Annotator: a person who annotates texts.
-
Coordinator: a person who coordinates annotators.
-
GitHub: a version control system where the corpus is hosted.
- Validator: a person who reviews annotation and text quality
Suggested items:
-
Structural annotation: Annotation of the headings of a work, including nesting.
-
Betacode: a transliteration system that allows easy conversion from one transliteration system to another, and into fully vocalized Arabic text. See https://alraqmiyyat.github.io/2015/02-07.html